
Math Monday: Counting - Part 2 - Rows/Rounds
Last week we took a look at counting stitches. This week we’ll be counting rows and rounds.
Before I start, I must say, this took me FOREVER to figure out. As much as it’s just counting, to me, it was always a question of whether you count what you see or you count some things you don’t see. I’ll explain. For purposes of the discussion, I’ll refer to rows (and not rounds) and then touch on special “round only” situations.

Cast-on row
Let’s begin at the beginning with the cast-on row. The cast on actually creates stitches. You can see them here, but this row does not count in your total number of rows. When instructions say, “Cast on 90 stitches and work 20 rows” it means just that. Do not be fooled into thinking that you only have to work 19 rows because the cast-on counts as a row. If you look carefully at where my finger is pointing, it looks like there are 2 Vs, but only 1 row has been worked. The first V is really the stitch formed on the cast-on. Again, do not count this V as a row!

The cast-on row and one knit row. Although 2 Vs appear, only 1 row has been worked.
The stitches that are looped on the needle do not count as a row. They are waiting to be worked into the next row.

Stockinette Stitch - 4 rows worked.
In the picture above, you can see 4 Vs (count vertically up the column of stitches between the red lines). The blue bar indicates the cast-on V which now fades into the background.
A little double check I use with Stockinette stitch is to remember that usually Row 1 is a knit row, and Row 2 is a purl row. This means that all the knit rows will be odd rows and all the purl rows will be even rows. In the picture above, you can see that I’m about to begin a knit row since the yarn is coming from the right. That means I’ve just completed an even (purl) row. Since 4 is an even number, I know that I’ve counted correctly. This also works with reverse Stockinette stitch, just remember that in this case, the purls are odd and the knits are even.

Right side

Wrong side
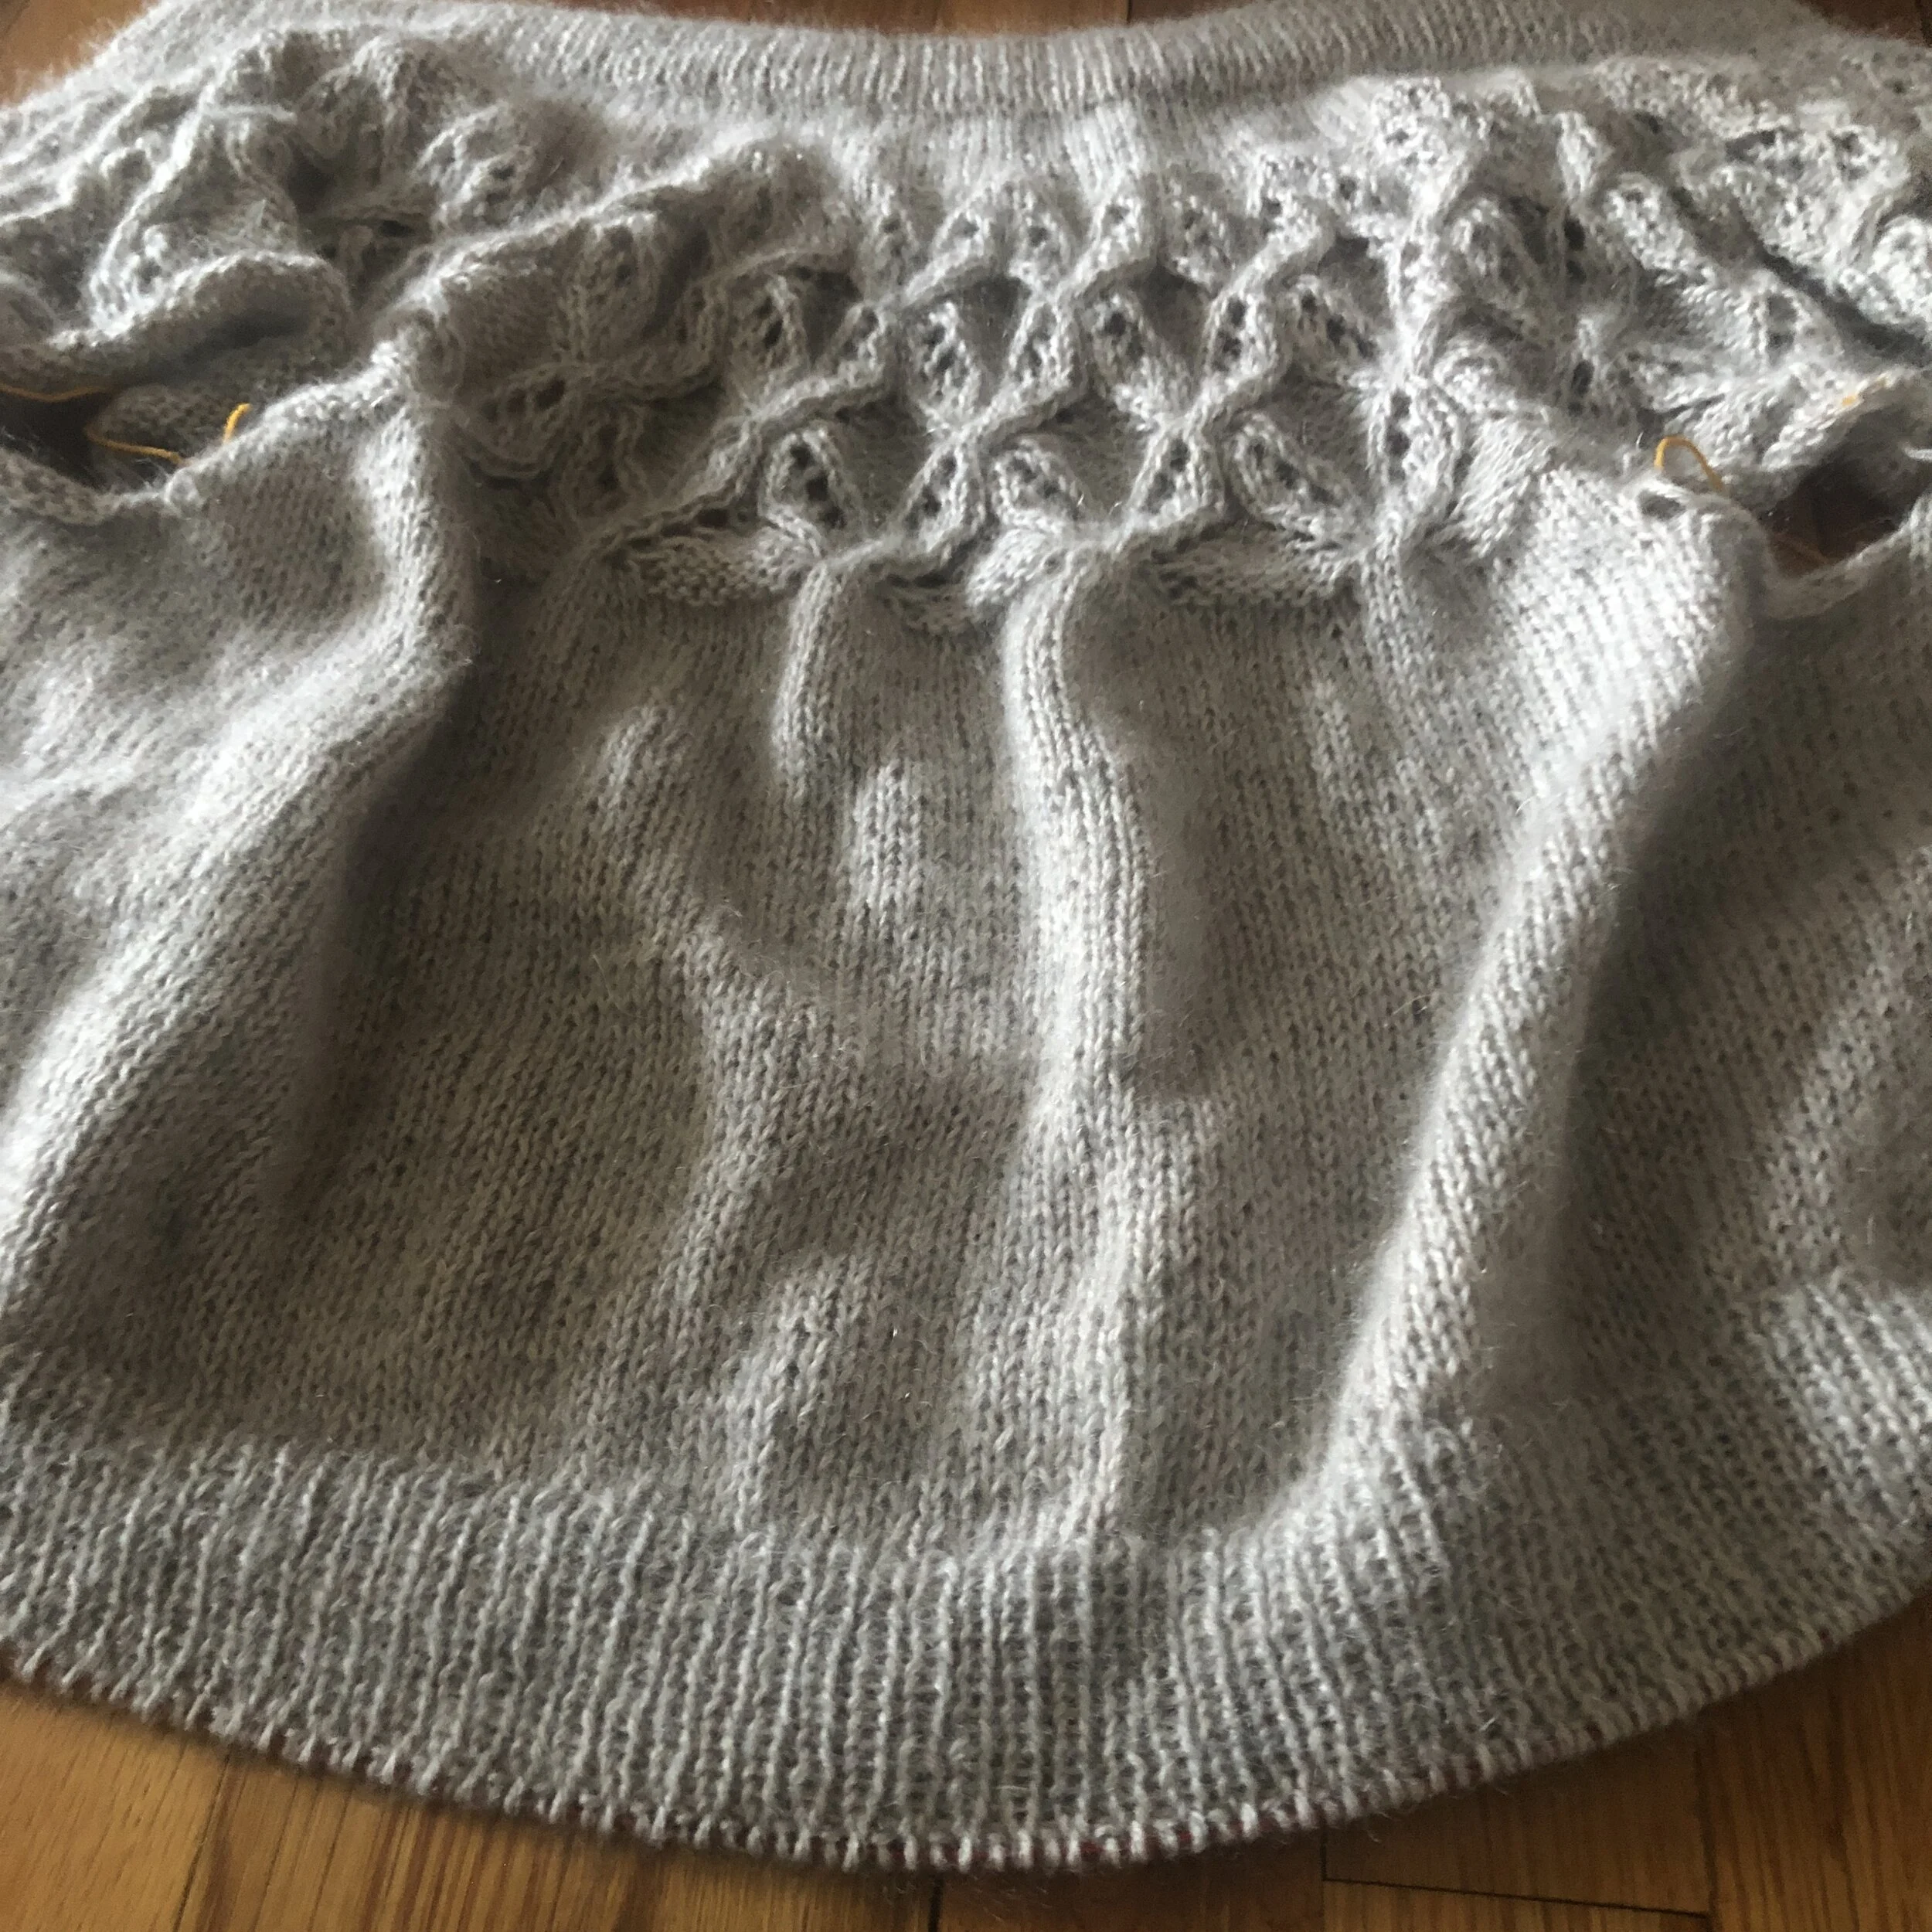
With garter stitch each ridge counts as 2 rows worked. However, sometimes, one side will have one fewer ridges than the other as in the two pictures above. If this is the case, then you have worked an odd number of rows. If both sides have the same number of ridges, you’ve worked an even number of rows. So, for example, if you have 5 ridges on one side and 4 ridges on the other, you’ve worked 9 rows. If you have 5 ridges on both sides, you’ll know you’ve worked 10 rows.
In garter stitch, though, be very careful. On one side of the work, the cast-on will appear to be a ridge.

Only 4 ridges here!
In the image above, the arrow points to a ridge of stitches which is really the cast-on. There are really only 4 ridges. Do NOT be fooled!
Finally, a discussion on rounds. Many times, you’re counting rounds as you complete them. If this is the case, just go ahead and count them the same way as you do for rows. However, if you’re like me, sometimes you’re counting rounds in the middle - either to check yourself (since there’s no right or wrong side) or to see how much longer you need to work for an increase or decrease. If that’s the case, know WHY. Do you want to know how many you’ve completed or do you want to know which round you’re working on?
If you want to know how many you’ve completed, count the rounds to the LEFT of you’re working yarn. If you want to know which round you’re working, count the rounds to the RIGHT of you’re working yarn.

Math Monday: Counting - Part I - Stitches
Before I became an elementary school teacher, I always thought that counting was the first thing you learned in math. It’s not! The first thing you learn is saying the numbers in order, really just chanting … 1 comes before 2 comes before 3, etc.
But … the second thing you learn in math is definitely counting which is really just one-to-one correspondence.
In knitting, counting can be tricky, but it’s critical to knitting. You’ll need to count stitches to make sure you’re on track in your pattern.
This week we’ll count stitches.
~~~~~~~~~~~~~~~~~~~~~~~~~~
This piece of knitting shown below is just plain Stockinette stitch — knit on the right side of the work, purl on the wrong side.
Each V represents a stitch.
In this picture, I’ve counted out 4 stitches.

Counting Stockinette stitches.
If you count carefully across the entire row, you will see that there are 22 Vs. I sometimes use a knit selvedge — knit the first and last stitch of every row — on my swatches, so you can see at the very beginning and very end something that looks like a knot. Those knots are actually a single stitch, so this swatch has 24 stitches — a selvedge stitch at the beginning (knot) + 22 stitches + a selvedge stitch at the end (knot). Go ahead, count the Vs. I’ll wait.
Things can become a bit more complicated in lace (where you’ll need to count the yarn overs) or cables (where some stitches disappear behind others), but the same basic principle applies. Count the Vs!

An example of counting stitches in lace.
I usually try to find the simplest (or the least complicated row), as in this lace example above, to count my stitches. For example. I’d never count the stitches in the row with the bobble. You can see that the row I’m counting bends a bit because of the first double decrease (Stitch #1). Stitches #6 and #12 are yarn overs, but you’ll need to count those too!

An example of counting stitches in a piece with cables. This swatch has Stockinette AND garter (knit every row), along with reverse Stockinette (purl on the right side, knit on the wrong side).
The cable example above is a bit more complex because it contains different kinds of stitches. They all won’t look like Vs. You can see the 3 Stockinette Vs at both ends of the cable (Stitches #1, 2, 3 and 9, 10, 11), but in the middle of the cable are 5 garter stitches (Stitches # 4, 5, 6, 7 & 8) that present as bars, although if you look carefully, you can see the Vs above the bars. You actually need to stretch out the cable to find Stitches #4 and 8 as they get covered up by the cable moving inward. Stitches #12, 13, 14 & 15 which are reverse Stockinette, also present as bars, but unlike the garter stitches, you cannot see the Vs above them.
Next week we’ll tackle counting rows and rounds.
Math Monday: Increasing - Part II - across a row
We’re ending our little mini-course on calculating increases and decreases with perhaps, the trickiest of all, increasing across a row. Not difficult to figure out, but tricky because increase placement depends on what kind of increase you’ll be working.
Let’s get the easy part out of the way first….
We want to start out with how many stitches we have on the needle at present. In other words, don’t use the final stitch count after the increases. You don’t have that many stitches yet!

Soul Perch - a cardigan to be published spring 2021.
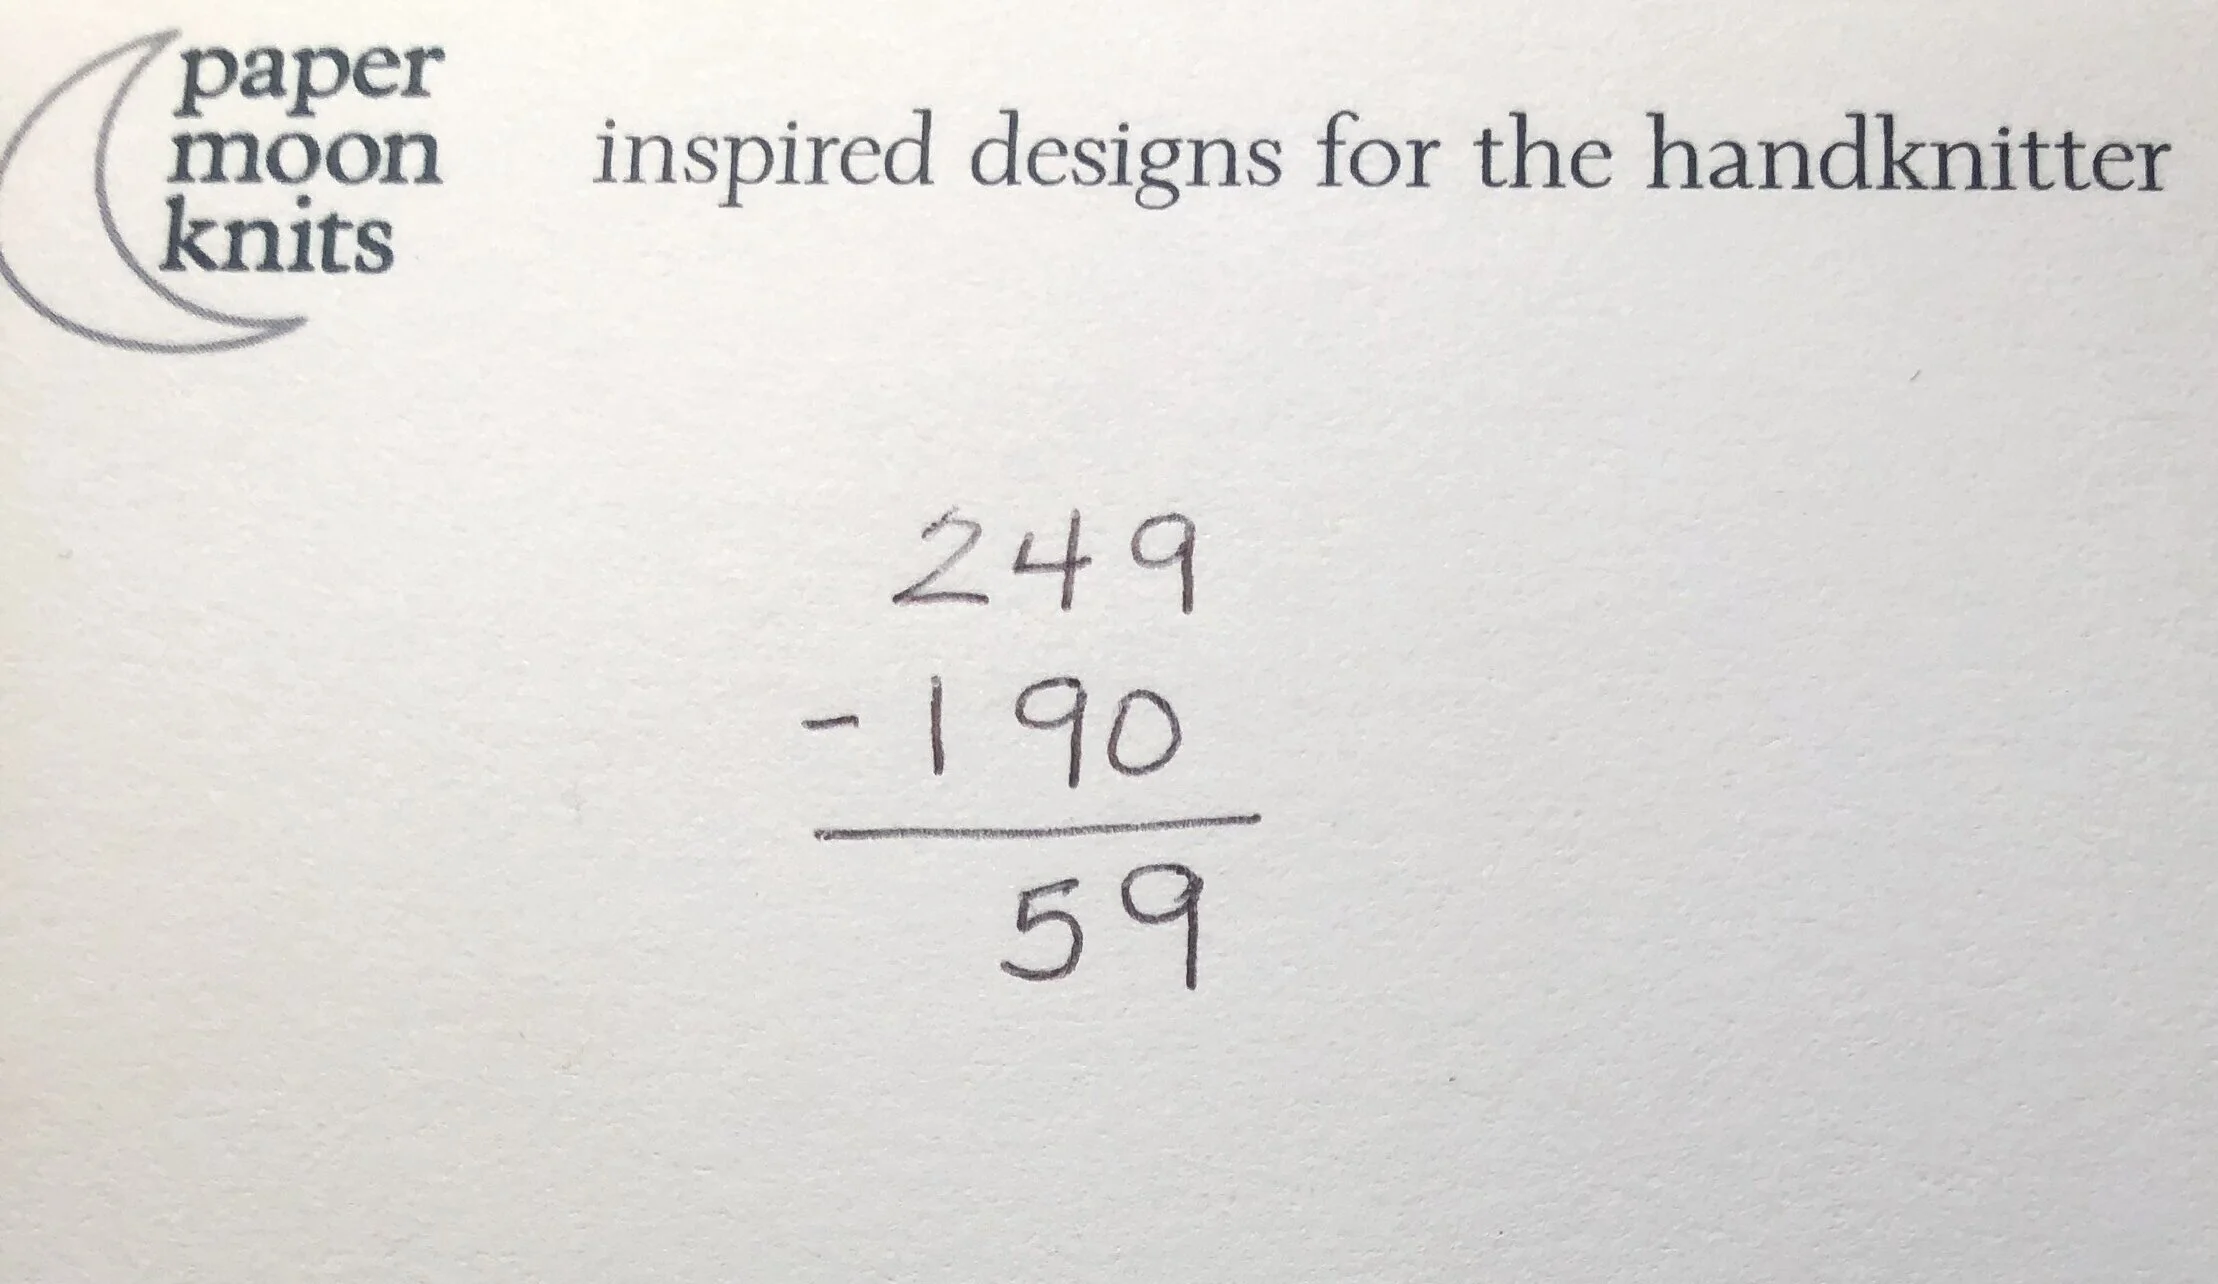
In this cardigan (to be published later this spring) which is worked from the top, we have 190 stitches on the needle for the body in Stockinette and we need 249 stitches for the ribbing.
This means we need to increase 59 stitches. {Subtract 190 from 249}
Divide 59 into what you have to work with….190 stitches.
Just like in our previous calculations, we divide; add 1 to the quotient; then subtract the remainder from the dividend and draw an X.

The formula tells us that we will increase 1 stitch every 3 stitches 46 times and every 4 stitches 13 times.
Remember our discussion on not decreasing on the first or last stitch? If you don’t, go back and read this post on decreasing across a row. We want to split that first 4 stitch increase in half and do the first one after 2 stitches.
But more importantly, we want to think about the increases we’ll use. This will help determine where to put them.
There are quite a few types of increases: knit through the front and back loop [kfb], yarn over [yo], Make 1 (and Make 1 Right and Make 1 Left [M1, M1R, M1L], and left leaning and right leaning increases [LLI, RLI].
The kfb, LLI and RLI all use the stitch on the needle itself. The yo is created with the working yarn. The M1, M1R and M1L all use the running thread between the stitches already on the needle.
Let’s use our example of placing increases every 4 stitches 13 times, and let’s also eliminate the kfb from our discussion. I rarely recommend using it unless you want the worked stitch to be a knit and the increase to be a purl.
For LLI you will make the increase in the 4th stitch by working the stitch, and then lifting the left leg of the stitch 2 rows below onto your needle to work the increase. The increase will slant left.
Left Lifted Increase - image (c) interweave.com
For the yo, M1, M1R, and M1L, you will make the increase after the 4th stitch has been worked. For the yo, just work the 4th stitch and yarn over. For the Make 1 increases, work into the running thread between the 4th and 5th stitches.
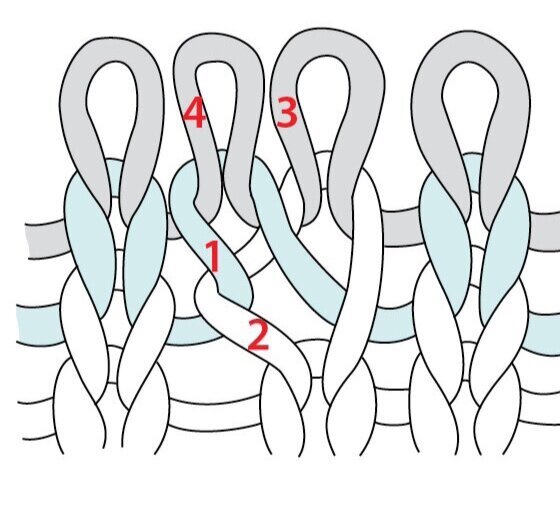
However, for the RLI, the increase is made in the 5th stitch. To work this increase, work the 4 stitches, then pick up the right leg of the stitch below the needle and knit into it, then knit the 5th stitch. The increase will be between the 4th and 5th stitch and lean right.

Right Lifted Increase - image (c) interweave.com
Next week, our math discussion turns to counting!

Math Monday: Increasing - Part I - along the length
A few Mondays ago, I discussed decreasing along the length of knitted fabric, and we did the calculations. Today, we’re going to do the same thing for increasing. You can read that here (in fact it might be useful if you did before you begin reading this one.)
The sleeve of Ledbetter is worked from cuff to underarm with a modified drop shoulder shaping to eliminate bulk at the underarm.
This works the exact same way, so let’s review using a new sweater that I’ll be publishing in the late summer/early fall, Ledbetter. Ledbetter’s sleeves are worked in the round from the cuff to the upper arm and then seamed onto the body. The sleeve is mostly worked in Stockinette stitch but it starts with a bit of the textured pattern - 1.5” [4cm]. The length of the entire sleeve with the cuff is 16.5” [42cm], but I’ll only be doing the increasing over the stockinette portion of the sleeve, not the cuff. That’s 15” [38cm].. As I wrote when we discussed decreasing, it’s never a good idea to immediately begin decreasing or increasing on the first row/round, and it’s never good to end them on the last row/round either. I usually begin and end with 1” [2.5cm] at the beginning and end worked even.
So, if we take out the 1.5” for the cuff and the 1” at the top and bottom the sleeve (2” total), we are left with 13” (16.5 - 1.5 - 2 = 13”). At a Stockinette row gauge of 6.75 rounds per inch, that leaves us with approximately 88 rounds with which to work {13 x 6.75 = 87.75 - I always round to the nearest even number}.
For Size 2, the cuff begins with 40 sts (9” x 4.25 sts/inch - rounded to the nearest 4 sts) and the upper arm ends with 60 sts (15” x 4 sts/inch), which means I need to increase 20 sts. Remember, these stitches are worked in sets - one at the beginning of the round, one at the end of the round. I’ll need 10 sets of 2 stitches each totaling 20 sts. However, I’ll do the very first set on the very first round since I’ve already left 1” before I’ve started the decreases I won’t need to leave more. This now brings the total down to 9 sets of decreases over 87 rounds.
I do the math just like I did for decreasing:

With this set up, you can see that you’ll have to do a increase every 9th round 3 times and every 10th round 6 times. You can decide how you’d like to set this up - you could do it as it’s laid out or you could do *every 10th round 2 times and then every 9th round once and then repeat from * twice more. All your increases will be evenly placed along that sleeve!
Of course, if you want to shorten or lengthen your sleeve, with this formula, it’s easy to do. You’ll still need the same number of increase sets (your divisor), but your dividend will change. You can use math to evenly space out your increases every time.
And this has other uses besides sleeves. You can add body shaping (waist to bust shaping (bottom up) or bust to waist (top down). for example. Or you can use this to modify a front or back neck depth or adjust an armhole.

A few thoughts before we finish…
Just like with decreasing, increases should never be placed at the very beginning or end of the row or the round. If you’re working in rows, it will be difficult to seam. If you’re working in rounds, the stitches will be distorted at the “seam line.” I usually place mine 2 stitches after the start of the row/round and 2 stitches before I end the row/round.
Another hint to make your knits aesthetically pleasing is to be sure your increases “lean” the way your sweater is growing. For example, in this sweater, the sleeve is being worked from the cuff up to the underarm, growing in circumference. Therefore, the increases at the beginning of the round should lean left and the ones at the end should lean right.
Using math to make adjustments to your knitting in this way will help you customize your garments for a more perfect fit.

Math Monday: Decreasing - Part II - across a row/round
In the last installment of MATH MONDAY, I wrote about the formula for calculating decreases along a specific length. (Go back and review that, if you’d like, but we’re going to do it again in a different iteration.) We started out with a slightly more difficult example. Today, I’m going to be sharing how you evenly place decreases across a row or a round.

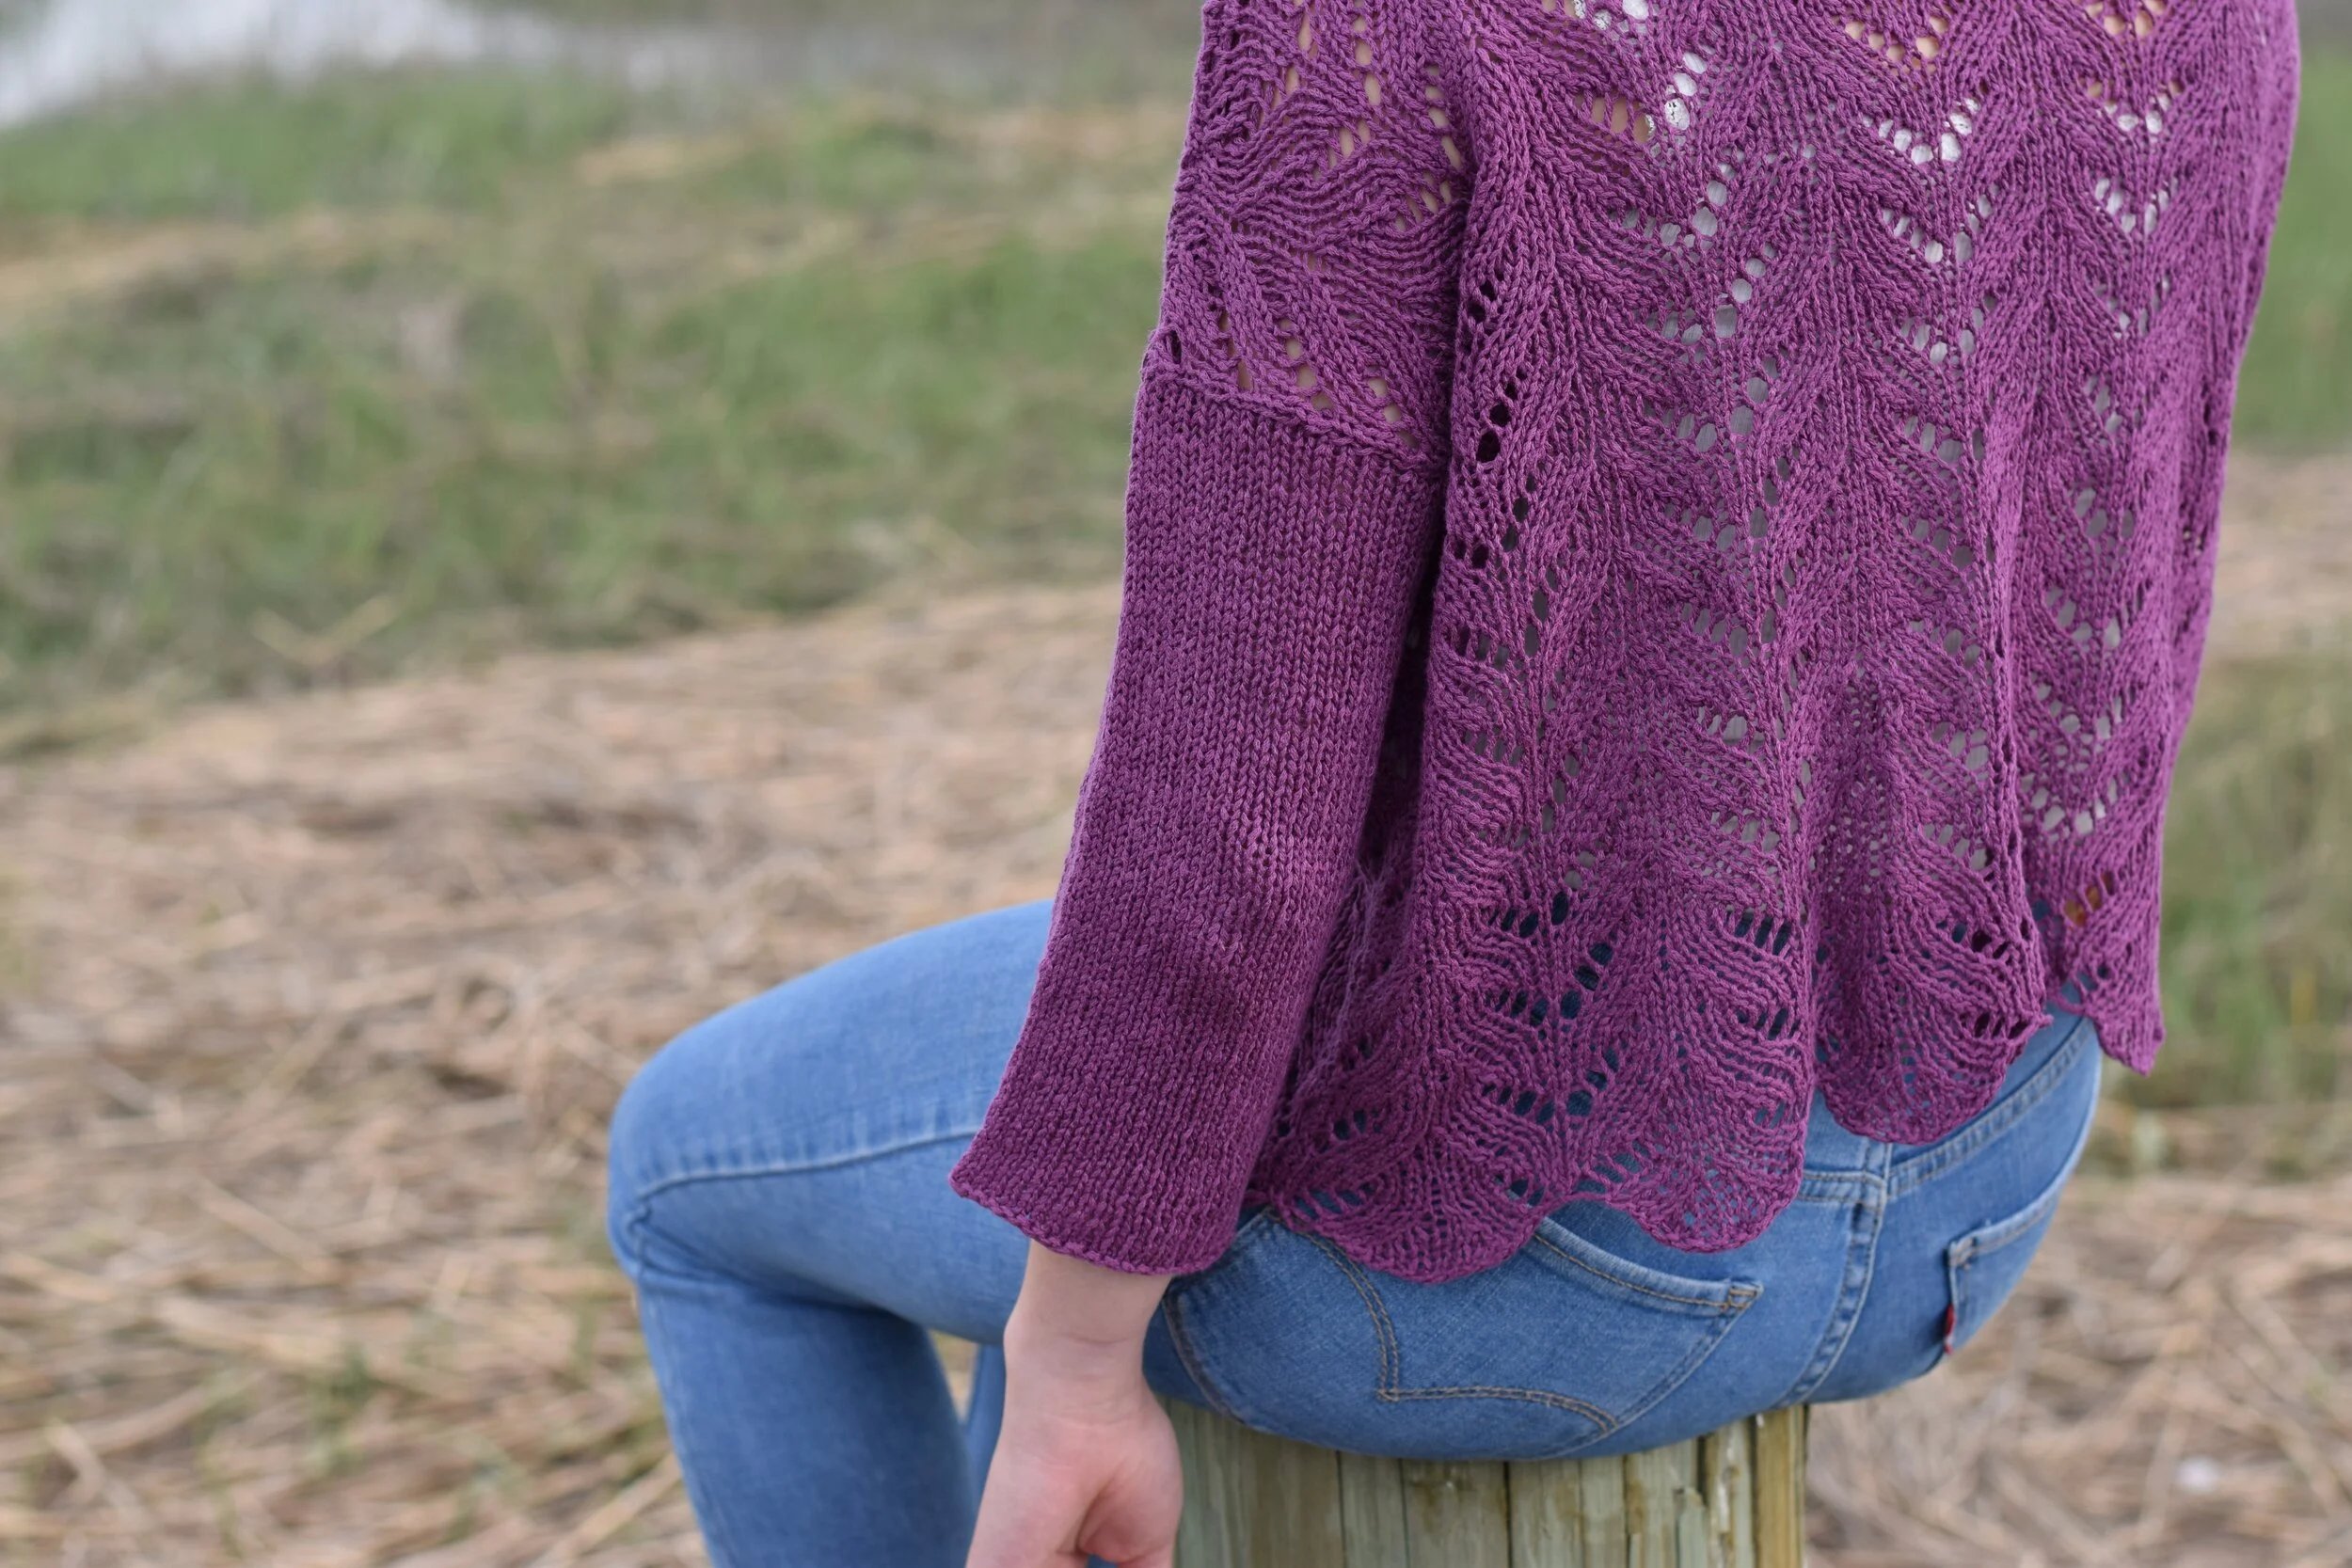
This is Barnstorm. The sleeves are a bit unusual.
Before we start, here’s a little bit about the sweater so we can work with the numbers: Barnstorm is a favorite of mine. I love the unique yoke patterning and ribbing. If you’re a sweater knitter, you know that typically, you need to decrease when you transition from ribbing to stockinette. Barnstorm is worked bottom up and has a split hem. The front and back hems are knitted flat in ribbing and then joined to work in the round. The rest of the body to the underarms is knit in stockinette. The sleeves have a split at the cuff, but follow the same sequence - ribbing flat, stockinette in the round to the underarm.

Sleeve detail in Barnstorm
We’ll be working on the sleeve decreases today. For this size the sleeves go from 55 sts to 38 sts. If we subtract these two numbers, we know we’ll need to decrease 17 sts across the row. We then set up our division equation, just like last time. We use 55 because this is how many stitches are starting with.
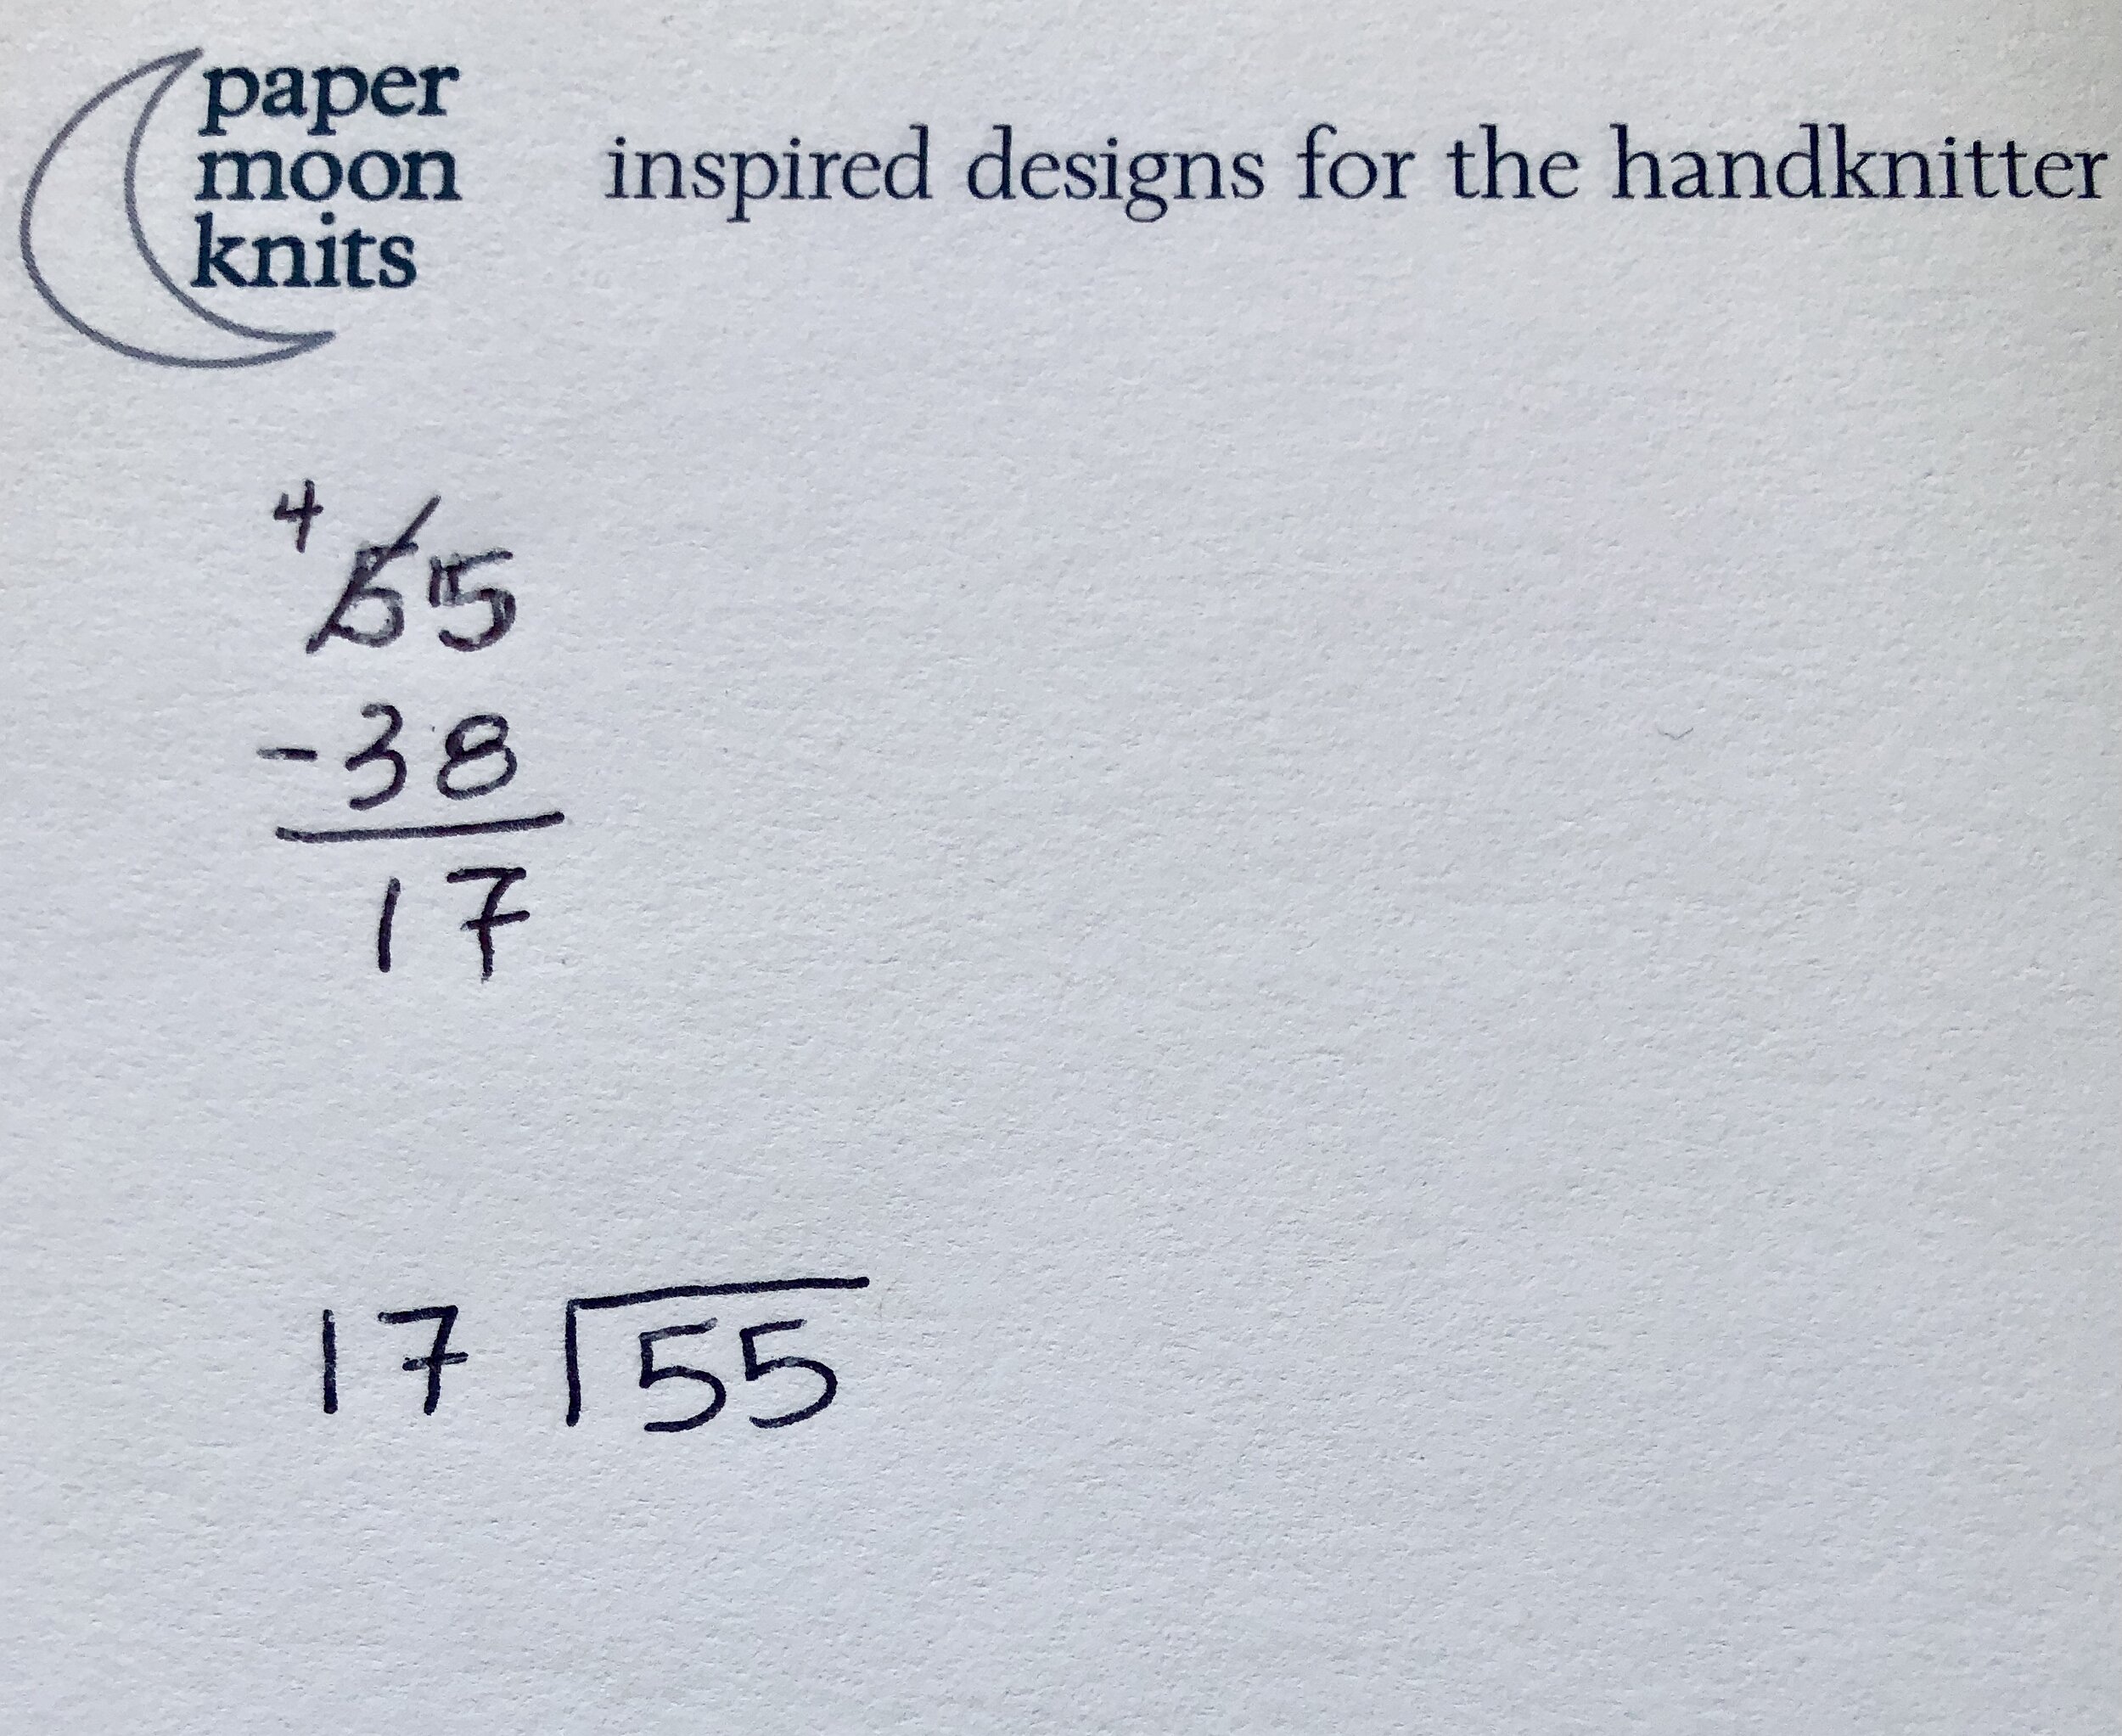
Just like last week, we solve the equation, adding 1 to the quotient and then subtracting the remainder from the divisor.

Draw the X from quotient to secondary remainder and from quotient + 1 to the remainder. We now know we have to decrease every 4th stitch 4 times and every 3rd stitch 13 times. This is a little different than last week because we are decreasing over stitches and not rows.

The first thing I want to say is that working a decrease every 4th stitch does not mean you work 4 sts and then do a decrease! It means that the decrease needs to occur so that the last worked stitch is stitch number 4.
In this case, if you’re using a k2tog decrease, you would k2, then k2tog. This would use 4 sts. If you’re working a decrease every 3rd stitch, you would k1, then k2tog. This would use 3 stitches. Remember, you only have 55 stitches to get all these decreases in.
Now for the execution. There are a number of different ways to do this. The first way is to just do the decreases as written - every 3rd stitch 13 times and every 4th stitch 4 times.
The second way would be to intersperse the every 4th between the every 3rd in a sort of even way. So every 3rd stitch 4 times, then every 4th stitch once, then every 3rd 4 times, then ever 4th once…. Four doesn’t divide evenly into 13 so you’d still have a bit of unevenness in this, and it involves math that isn’t really necessary - no one will really notice whether you’re decreasing on the 3rd or 4th stitch, except if they’re using a magnifying glass. I don’t like either of these ways because your final decrease will be on the very last stitch. Not a great idea!
Here’s what I like to do:
First I take the decrease that I’m going to do fewer times, in this case the 4th stitch every 4x, and I divide that in half. I’ll do this decrease 2x at the beginning of the row and then 2x at the end with the 13 decreases every 3rd stitch in between. Before I get started though, I want to make sure I don’t end up with a decrease on the very last stitch, so I’ll split that first decrease in half. Instead of doing it at the 4th stitch, I’ll do it at the 2nd. This works when the first decrease is more than 2 stitches because if I do this, then I’ll have to start out with a decrease at the very beginning of the row (remember, the last stitch of the decrease will have to be on stitch 2 which means I’ll start out with a k2tog) - also not a good idea.
So what I’ll do in this case is k1, k2tog as my very first 4 stitch decrease - (I know it’s really only 3 stitches). Then I’ll do k2, k2tog (my second 4-stitch decrease). Then I’ll do k1, k2tog 13 times. Then I’ll do k2, k2tog 2 times (as my last two 4-stitch decreases and I have 1 stitch left over. The beginning and the end of the row have the same number of stitches!
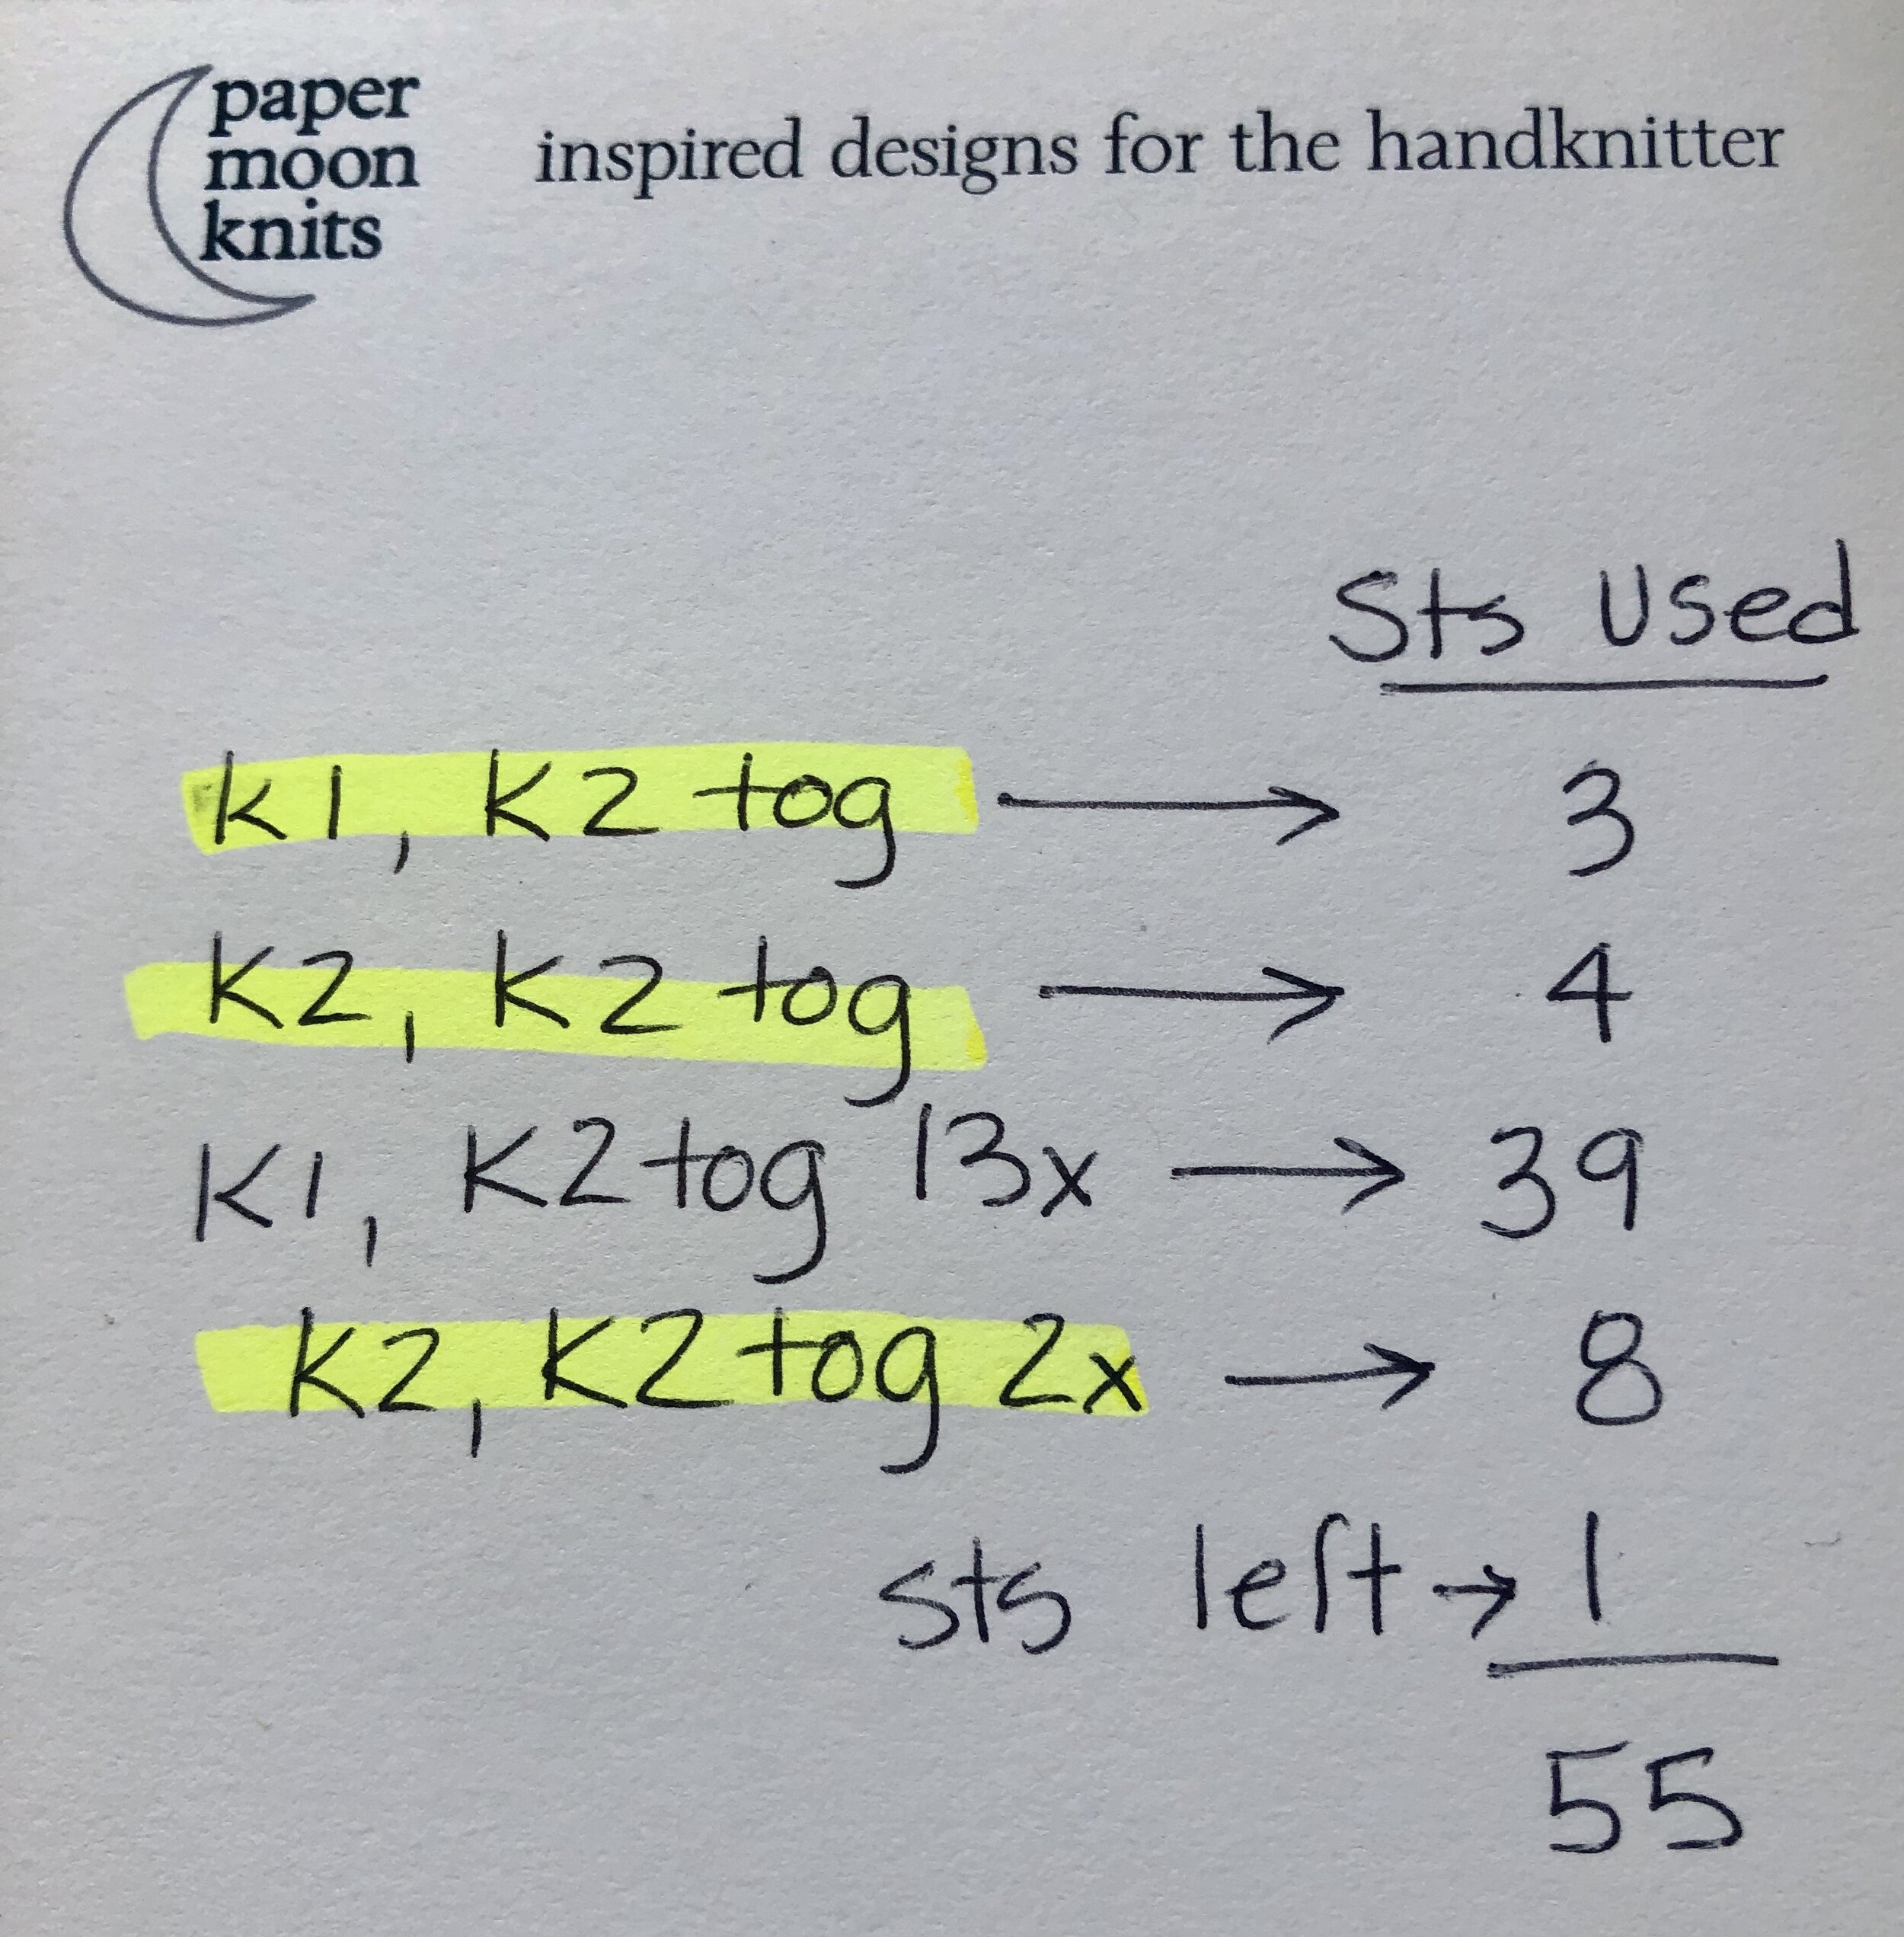
The proof is in the math! The highlighted lines show the 4-stitch decreases done 4 times.
The beauty of this method is that it works the same way for knitting flat as knitting in the round. The one stitch at the beginning and end of the round equal 2 stitches between the k2togs.
Math Monday: Decreasing - Part I - along the length

This is Enracine, a cool linen top from 2020.
Long division. Do you remember?
This Monday, I’ll be teaching you how to use long division to calculate decreases —one that is used to taper a sleeve or the body of a sweater. Next week we’ll use it for decreases along a row or round.

Sleeve schematic for Enracine
There are 3 measurements you’ll need to calculate this type of decrease: a starting point (E), an ending point (G) and the length over which you’d like the decreases to occur (F). Of course, you’ll also need your stitch and row gauge.
In the sample size, the starting point circumference was 13” [33cm]. If we multiply this number by our stitch gauge of 4.75 sts/inch, we know that our starting point stitch count is 62 sts - rounded to the nearest even number. Our ending point circumference is 9.5” [24cm]. If we multiply this number by by our stitch gauge, we know that our ending stitch count is 46 sts - again, rounded to the nearest even number. By the way, it doesn’t have to be even, but both numbers have to be the same - both odd or both even.
The difference between 62 and 46 is 16 sts, and we need to do these decreases in sets, one on each side of the “seam line” of the sleeve. This means there are 8 sets of decrease points along the sleeve for this size (16 divided by 2).

The decreases occur at the inside of the sleeve.
Now for this design, I wanted three-quarter sleeves, so the length of the sleeve for all sizes is 9.5” [24cm]. They seem shorter than normal because this design was a drop shoulder. We’ll discuss that another time. The row gauge is 8.25 rounds per inch as the sleeves are knitted in the round. It works the same way for pieces knitted flat. Decreases shouldn’t start at the first round of the piece and shouldn’t end on the last round either, so the rule of thumb is usually to leave 1” [2.5cm] at the top and bottom before the first and after the last decrease. This reduces our length by 2” [5cm]. Now we only have 7.5” [19cm] to work with.
Multiply 7.5” by our row gauge of 8.25 gives us approximately 60 rounds to work with.
Now comes the long division:

Follow the steps beginning at the top left.
Only 1 more step and we’re done!

Draw arrows that cross from the quotient and the quotient + 1 to the remainder and the difference between the divisor and remainder. This tells you that to get evenly spaced decreases, you work a set of decreases every 7th round 4 times, and every 8th round 4 times. You can alternate these - every 7th, then every 8th, then every 7th…. - or you can just work decreases every 8th round 4 times, then every 7th round 4 times.
You can also do a little math check if you want to prove to yourself it works:

Multiply number of rounds to decrease by number of times to check your answer! IT WORKS !
Now isn’t math awesome?

Math Monday: Calculating Yards per Gram
Last week I wrote about the mystery yarn I picked up from Harrisville Designs at Rhinebeck - the one without a name or a label to list yardage or weight.
Maybe you have some yarn in your stash that doesn’t have a label or a partial skein that you knitted long ago, but you have no idea what it is. This week, I’m going to show you how to use simple measuring and math to calculate how much yardage is in my mystery yarn. You can try it with your stash mysteries too!
You’ll need 3 things: a rigid ruler, a scale that measures grams and a calculator - your phone calculator will do nicely.

Step 1: Weigh your skein or cake. In this picture, you can see that the cake’s weight is 113 grams.

Step 2: This ruler is 1 foot long. A yard is 3 feet long. I wrapped the yarn (without pulling too tightly) around the ruler 9 times. 9 feet of yarn divided by 3 feet per yard = 3 yards. So I have 3 yards of yarn.

Step 3: Weigh 3 yards of yarn you measured out. You can see that the 3 yards weighs 2 grams.
Step 4: Now the math part. We’ll set up a ratio. Don’t be scared. You did this in 8th grade.

x is the unknown yardage of the cake. We know the cake weighs 113g. So on one side of the equation we write x over 113. We also know that 3 yards of yarn weigh 2g. On the other side of the equation we write 3 over 2. When you do this, be sure that your yardage is on top and your weights are on the bottom on both sides of the equation.
Now cross multiply: x multiplied by 2 on one side of the equation (2x) and 113 multiplied by 3 (339) on the other side of the equation.
Now solve for x. You might remember that what you do to one side of the equation, you must do to the other side of the equation. So divide both sides by 2: 2x divided by 2 equals x; 339 divided by 2 equals 169.5.
And there you have it. You’ve calculated your yardage!!! This means that 113g of this yarn has 169.5 yards in a cake of 113g.

Of course, each skein varies a little in weight. I can use my calculated yardage per skein as an estimate or, if I want a more accurate accounting of how much yarn I have, I can weigh each skein and calculate more precisely by substituting the weight of each skein for 113g in the example above.
Give it a try and let me know how it goes.