
Math Monday: Counting - Part 2 - Rows/Rounds
Last week we took a look at counting stitches. This week we’ll be counting rows and rounds.
Before I start, I must say, this took me FOREVER to figure out. As much as it’s just counting, to me, it was always a question of whether you count what you see or you count some things you don’t see. I’ll explain. For purposes of the discussion, I’ll refer to rows (and not rounds) and then touch on special “round only” situations.

Cast-on row
Let’s begin at the beginning with the cast-on row. The cast on actually creates stitches. You can see them here, but this row does not count in your total number of rows. When instructions say, “Cast on 90 stitches and work 20 rows” it means just that. Do not be fooled into thinking that you only have to work 19 rows because the cast-on counts as a row. If you look carefully at where my finger is pointing, it looks like there are 2 Vs, but only 1 row has been worked. The first V is really the stitch formed on the cast-on. Again, do not count this V as a row!

The cast-on row and one knit row. Although 2 Vs appear, only 1 row has been worked.
The stitches that are looped on the needle do not count as a row. They are waiting to be worked into the next row.

Stockinette Stitch - 4 rows worked.
In the picture above, you can see 4 Vs (count vertically up the column of stitches between the red lines). The blue bar indicates the cast-on V which now fades into the background.
A little double check I use with Stockinette stitch is to remember that usually Row 1 is a knit row, and Row 2 is a purl row. This means that all the knit rows will be odd rows and all the purl rows will be even rows. In the picture above, you can see that I’m about to begin a knit row since the yarn is coming from the right. That means I’ve just completed an even (purl) row. Since 4 is an even number, I know that I’ve counted correctly. This also works with reverse Stockinette stitch, just remember that in this case, the purls are odd and the knits are even.

Right side

Wrong side
With garter stitch each ridge counts as 2 rows worked. However, sometimes, one side will have one fewer ridges than the other as in the two pictures above. If this is the case, then you have worked an odd number of rows. If both sides have the same number of ridges, you’ve worked an even number of rows. So, for example, if you have 5 ridges on one side and 4 ridges on the other, you’ve worked 9 rows. If you have 5 ridges on both sides, you’ll know you’ve worked 10 rows.
In garter stitch, though, be very careful. On one side of the work, the cast-on will appear to be a ridge.

Only 4 ridges here!
In the image above, the arrow points to a ridge of stitches which is really the cast-on. There are really only 4 ridges. Do NOT be fooled!
Finally, a discussion on rounds. Many times, you’re counting rounds as you complete them. If this is the case, just go ahead and count them the same way as you do for rows. However, if you’re like me, sometimes you’re counting rounds in the middle - either to check yourself (since there’s no right or wrong side) or to see how much longer you need to work for an increase or decrease. If that’s the case, know WHY. Do you want to know how many you’ve completed or do you want to know which round you’re working on?
If you want to know how many you’ve completed, count the rounds to the LEFT of you’re working yarn. If you want to know which round you’re working, count the rounds to the RIGHT of you’re working yarn.

Math Monday: Increasing - Part I - along the length
A few Mondays ago, I discussed decreasing along the length of knitted fabric, and we did the calculations. Today, we’re going to do the same thing for increasing. You can read that here (in fact it might be useful if you did before you begin reading this one.)
The sleeve of Ledbetter is worked from cuff to underarm with a modified drop shoulder shaping to eliminate bulk at the underarm.
This works the exact same way, so let’s review using a new sweater that I’ll be publishing in the late summer/early fall, Ledbetter. Ledbetter’s sleeves are worked in the round from the cuff to the upper arm and then seamed onto the body. The sleeve is mostly worked in Stockinette stitch but it starts with a bit of the textured pattern - 1.5” [4cm]. The length of the entire sleeve with the cuff is 16.5” [42cm], but I’ll only be doing the increasing over the stockinette portion of the sleeve, not the cuff. That’s 15” [38cm].. As I wrote when we discussed decreasing, it’s never a good idea to immediately begin decreasing or increasing on the first row/round, and it’s never good to end them on the last row/round either. I usually begin and end with 1” [2.5cm] at the beginning and end worked even.
So, if we take out the 1.5” for the cuff and the 1” at the top and bottom the sleeve (2” total), we are left with 13” (16.5 - 1.5 - 2 = 13”). At a Stockinette row gauge of 6.75 rounds per inch, that leaves us with approximately 88 rounds with which to work {13 x 6.75 = 87.75 - I always round to the nearest even number}.
For Size 2, the cuff begins with 40 sts (9” x 4.25 sts/inch - rounded to the nearest 4 sts) and the upper arm ends with 60 sts (15” x 4 sts/inch), which means I need to increase 20 sts. Remember, these stitches are worked in sets - one at the beginning of the round, one at the end of the round. I’ll need 10 sets of 2 stitches each totaling 20 sts. However, I’ll do the very first set on the very first round since I’ve already left 1” before I’ve started the decreases I won’t need to leave more. This now brings the total down to 9 sets of decreases over 87 rounds.
I do the math just like I did for decreasing:

With this set up, you can see that you’ll have to do a increase every 9th round 3 times and every 10th round 6 times. You can decide how you’d like to set this up - you could do it as it’s laid out or you could do *every 10th round 2 times and then every 9th round once and then repeat from * twice more. All your increases will be evenly placed along that sleeve!
Of course, if you want to shorten or lengthen your sleeve, with this formula, it’s easy to do. You’ll still need the same number of increase sets (your divisor), but your dividend will change. You can use math to evenly space out your increases every time.
And this has other uses besides sleeves. You can add body shaping (waist to bust shaping (bottom up) or bust to waist (top down). for example. Or you can use this to modify a front or back neck depth or adjust an armhole.

A few thoughts before we finish…
Just like with decreasing, increases should never be placed at the very beginning or end of the row or the round. If you’re working in rows, it will be difficult to seam. If you’re working in rounds, the stitches will be distorted at the “seam line.” I usually place mine 2 stitches after the start of the row/round and 2 stitches before I end the row/round.
Another hint to make your knits aesthetically pleasing is to be sure your increases “lean” the way your sweater is growing. For example, in this sweater, the sleeve is being worked from the cuff up to the underarm, growing in circumference. Therefore, the increases at the beginning of the round should lean left and the ones at the end should lean right.
Using math to make adjustments to your knitting in this way will help you customize your garments for a more perfect fit.

Math Monday: Decreasing - Part II - across a row/round
In the last installment of MATH MONDAY, I wrote about the formula for calculating decreases along a specific length. (Go back and review that, if you’d like, but we’re going to do it again in a different iteration.) We started out with a slightly more difficult example. Today, I’m going to be sharing how you evenly place decreases across a row or a round.

This is Barnstorm. The sleeves are a bit unusual.
Before we start, here’s a little bit about the sweater so we can work with the numbers: Barnstorm is a favorite of mine. I love the unique yoke patterning and ribbing. If you’re a sweater knitter, you know that typically, you need to decrease when you transition from ribbing to stockinette. Barnstorm is worked bottom up and has a split hem. The front and back hems are knitted flat in ribbing and then joined to work in the round. The rest of the body to the underarms is knit in stockinette. The sleeves have a split at the cuff, but follow the same sequence - ribbing flat, stockinette in the round to the underarm.

Sleeve detail in Barnstorm
We’ll be working on the sleeve decreases today. For this size the sleeves go from 55 sts to 38 sts. If we subtract these two numbers, we know we’ll need to decrease 17 sts across the row. We then set up our division equation, just like last time. We use 55 because this is how many stitches are starting with.
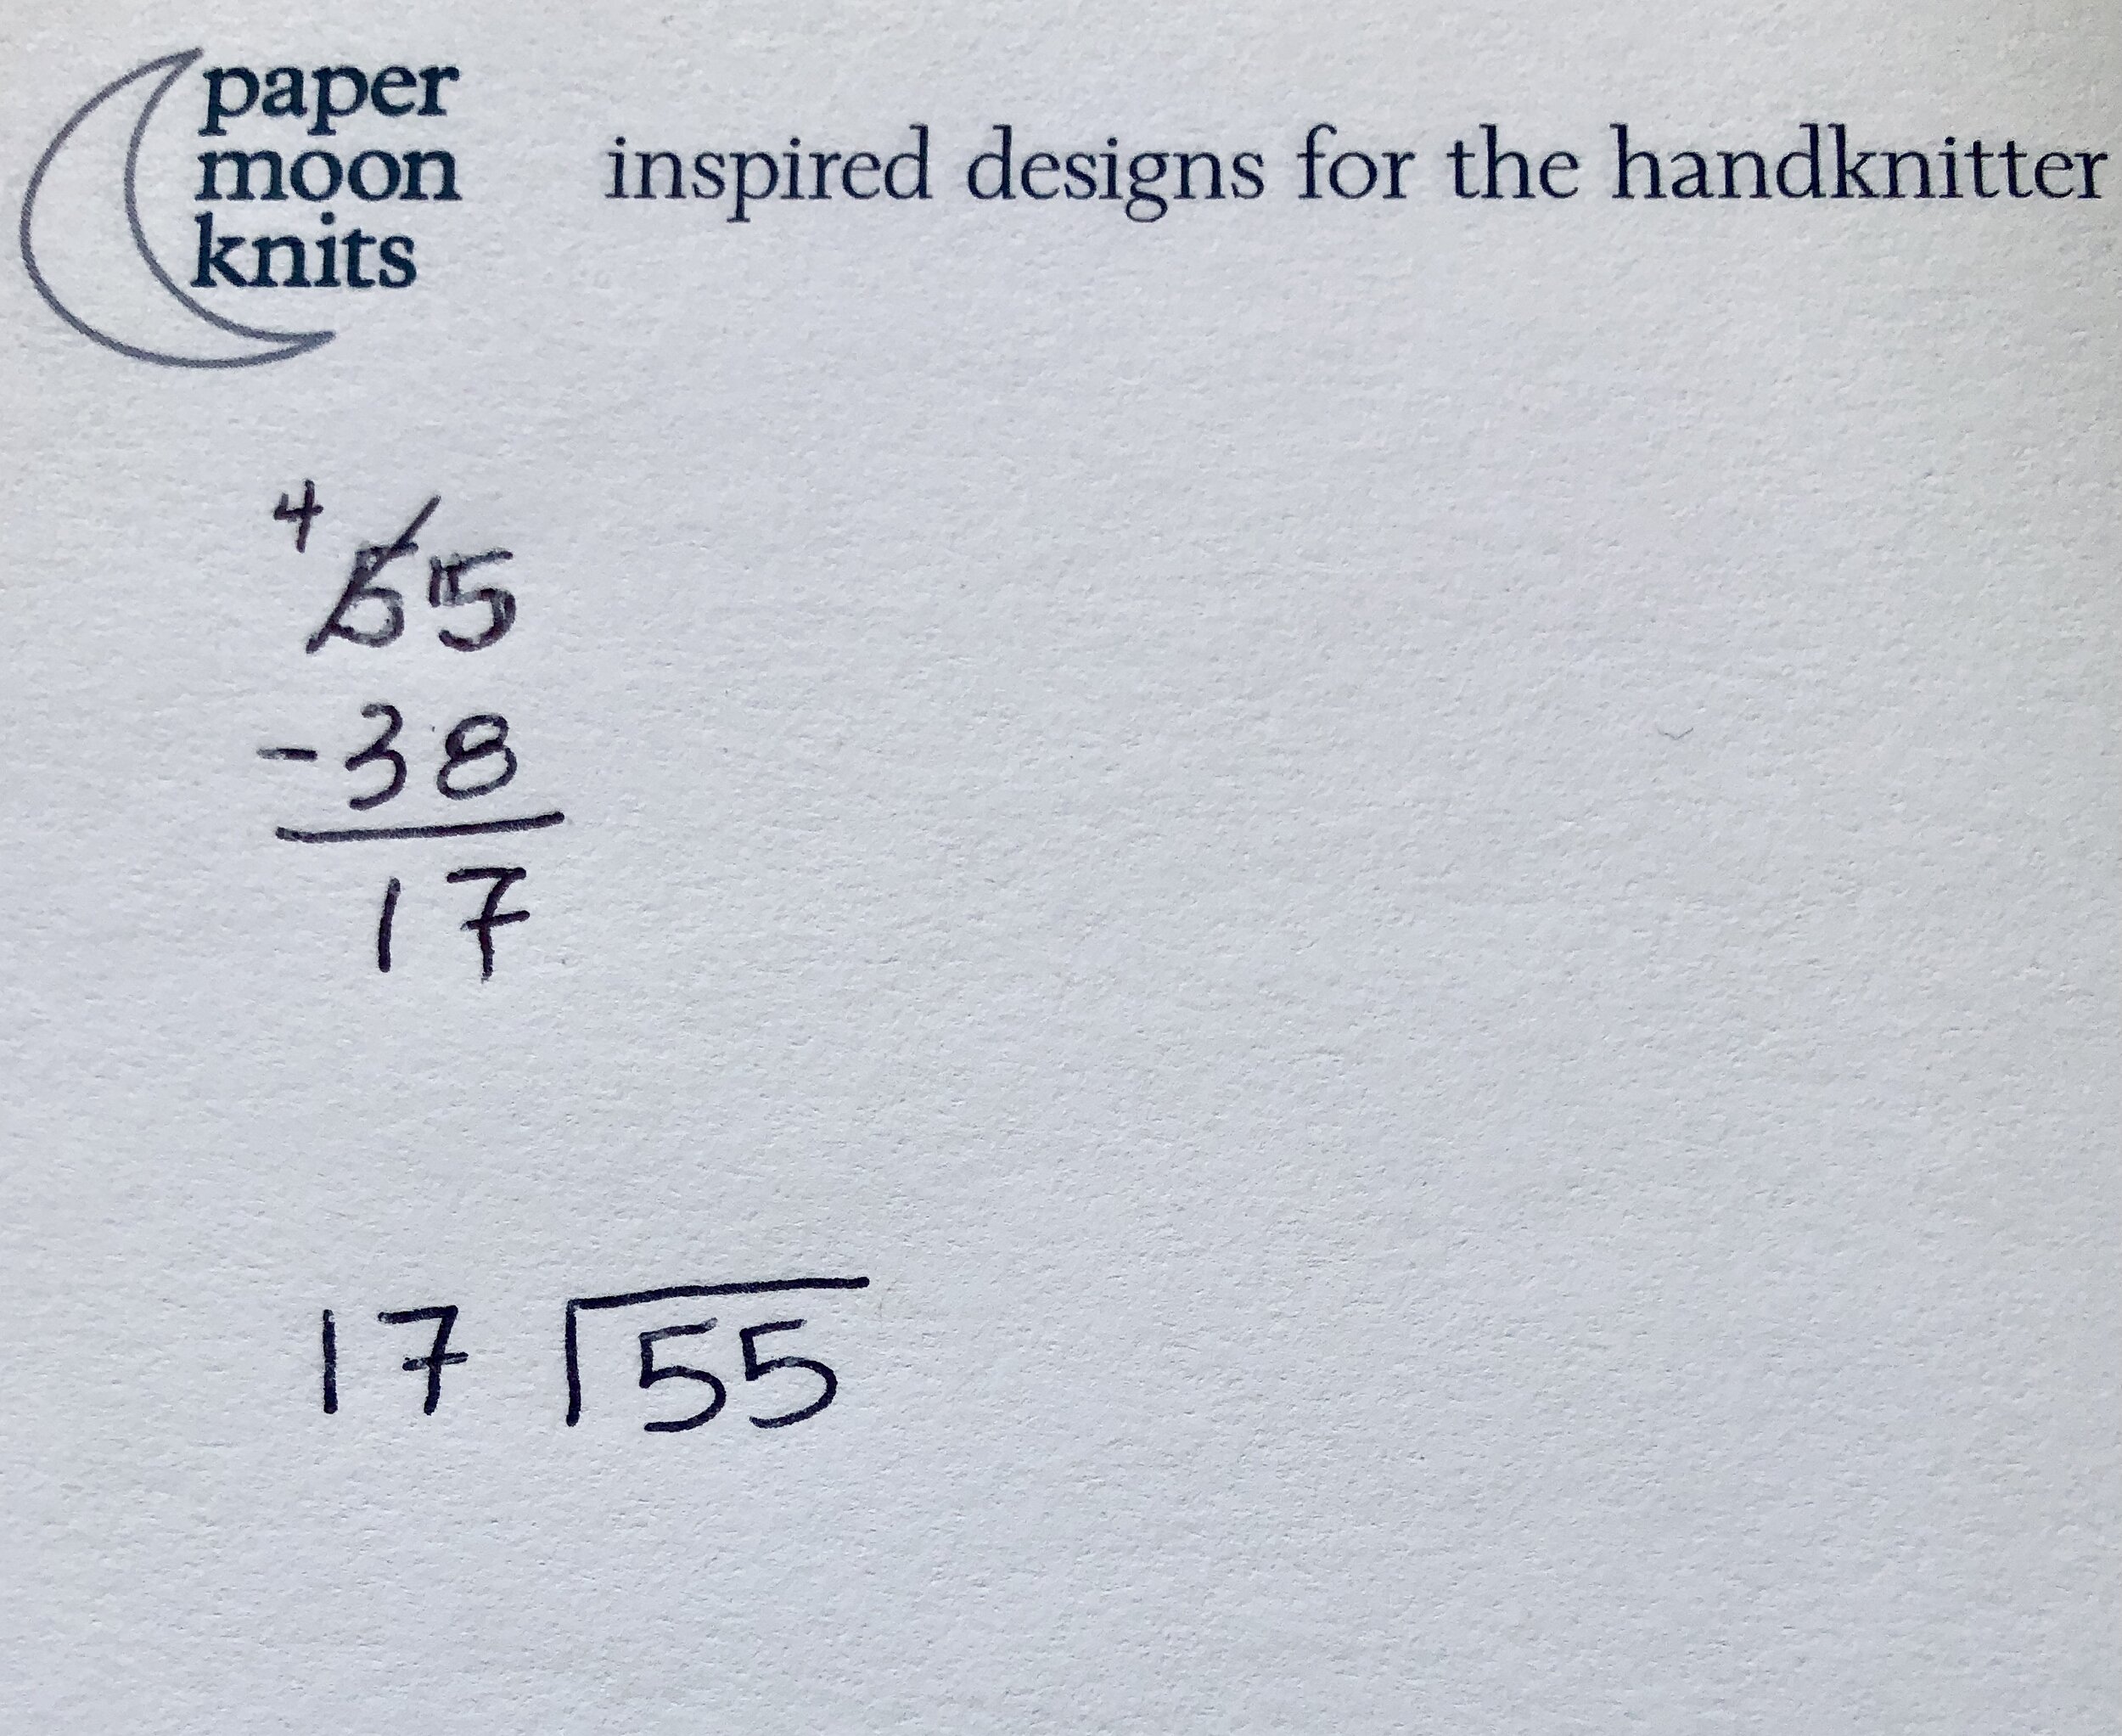
Just like last week, we solve the equation, adding 1 to the quotient and then subtracting the remainder from the divisor.

Draw the X from quotient to secondary remainder and from quotient + 1 to the remainder. We now know we have to decrease every 4th stitch 4 times and every 3rd stitch 13 times. This is a little different than last week because we are decreasing over stitches and not rows.

The first thing I want to say is that working a decrease every 4th stitch does not mean you work 4 sts and then do a decrease! It means that the decrease needs to occur so that the last worked stitch is stitch number 4.
In this case, if you’re using a k2tog decrease, you would k2, then k2tog. This would use 4 sts. If you’re working a decrease every 3rd stitch, you would k1, then k2tog. This would use 3 stitches. Remember, you only have 55 stitches to get all these decreases in.
Now for the execution. There are a number of different ways to do this. The first way is to just do the decreases as written - every 3rd stitch 13 times and every 4th stitch 4 times.
The second way would be to intersperse the every 4th between the every 3rd in a sort of even way. So every 3rd stitch 4 times, then every 4th stitch once, then every 3rd 4 times, then ever 4th once…. Four doesn’t divide evenly into 13 so you’d still have a bit of unevenness in this, and it involves math that isn’t really necessary - no one will really notice whether you’re decreasing on the 3rd or 4th stitch, except if they’re using a magnifying glass. I don’t like either of these ways because your final decrease will be on the very last stitch. Not a great idea!
Here’s what I like to do:
First I take the decrease that I’m going to do fewer times, in this case the 4th stitch every 4x, and I divide that in half. I’ll do this decrease 2x at the beginning of the row and then 2x at the end with the 13 decreases every 3rd stitch in between. Before I get started though, I want to make sure I don’t end up with a decrease on the very last stitch, so I’ll split that first decrease in half. Instead of doing it at the 4th stitch, I’ll do it at the 2nd. This works when the first decrease is more than 2 stitches because if I do this, then I’ll have to start out with a decrease at the very beginning of the row (remember, the last stitch of the decrease will have to be on stitch 2 which means I’ll start out with a k2tog) - also not a good idea.
So what I’ll do in this case is k1, k2tog as my very first 4 stitch decrease - (I know it’s really only 3 stitches). Then I’ll do k2, k2tog (my second 4-stitch decrease). Then I’ll do k1, k2tog 13 times. Then I’ll do k2, k2tog 2 times (as my last two 4-stitch decreases and I have 1 stitch left over. The beginning and the end of the row have the same number of stitches!
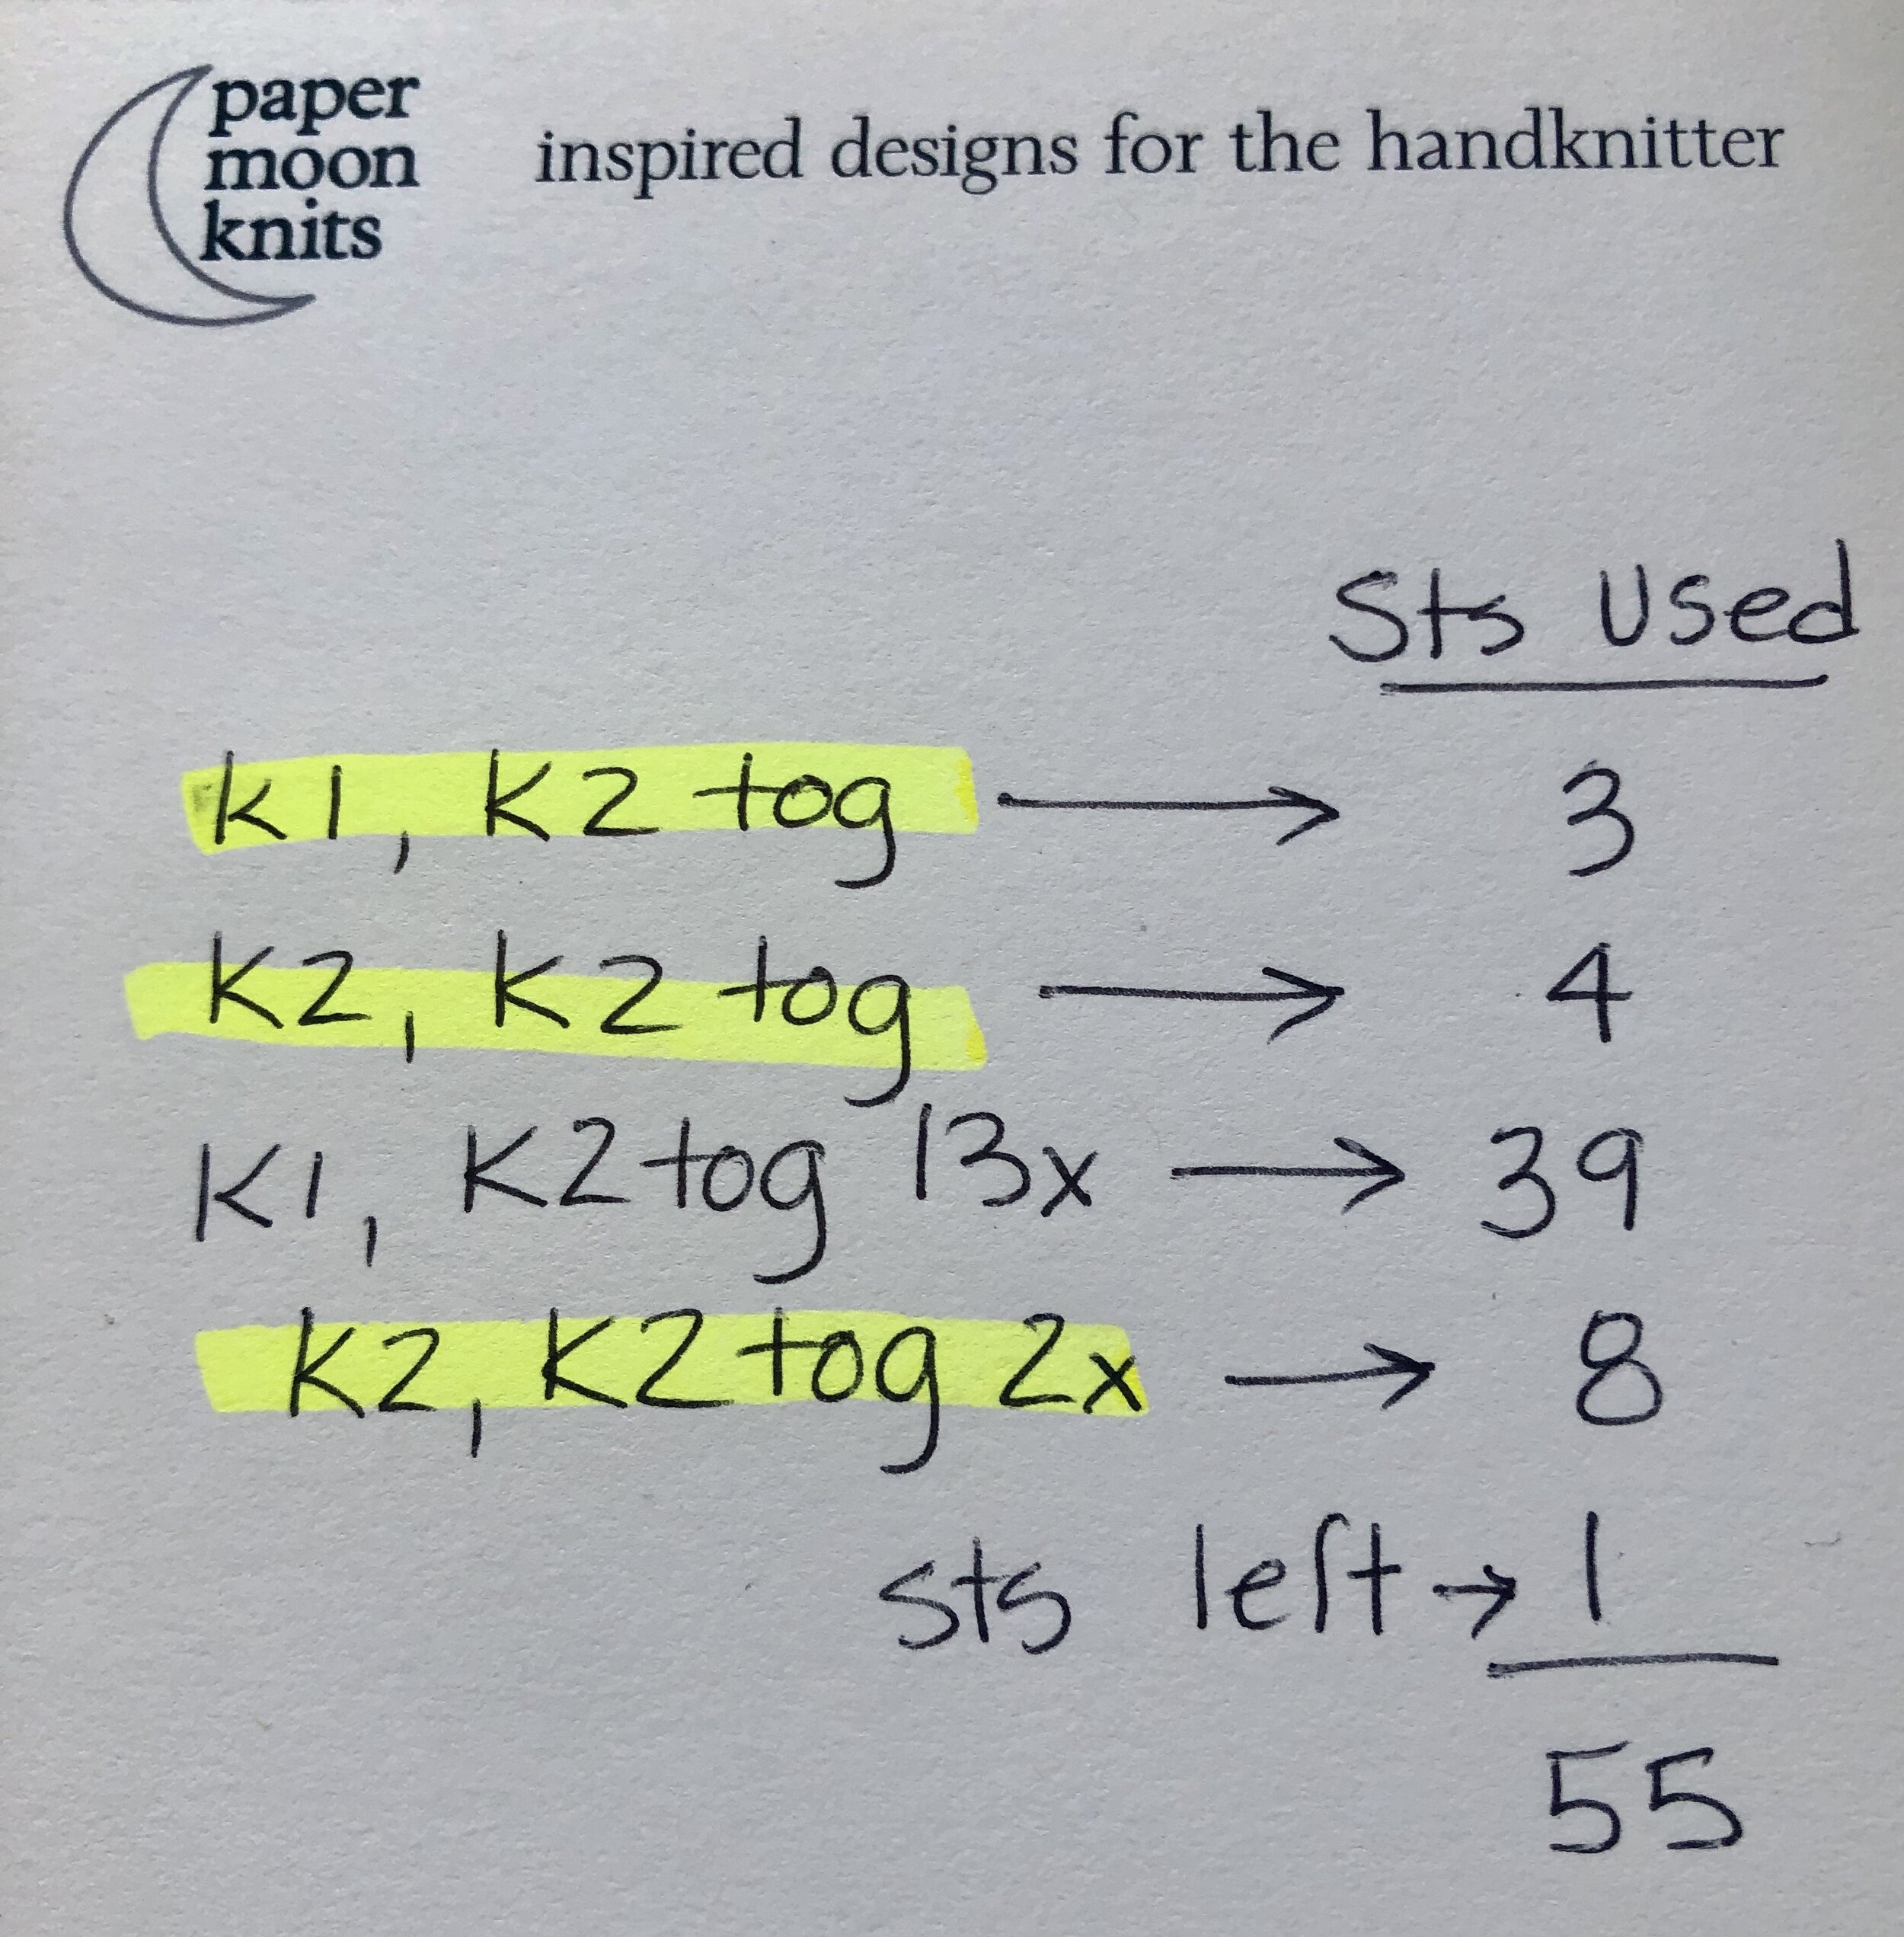
The proof is in the math! The highlighted lines show the 4-stitch decreases done 4 times.
The beauty of this method is that it works the same way for knitting flat as knitting in the round. The one stitch at the beginning and end of the round equal 2 stitches between the k2togs.

Math Monday: Calculating Yards per Gram
Last week I wrote about the mystery yarn I picked up from Harrisville Designs at Rhinebeck - the one without a name or a label to list yardage or weight.
Maybe you have some yarn in your stash that doesn’t have a label or a partial skein that you knitted long ago, but you have no idea what it is. This week, I’m going to show you how to use simple measuring and math to calculate how much yardage is in my mystery yarn. You can try it with your stash mysteries too!
You’ll need 3 things: a rigid ruler, a scale that measures grams and a calculator - your phone calculator will do nicely.

Step 1: Weigh your skein or cake. In this picture, you can see that the cake’s weight is 113 grams.

Step 2: This ruler is 1 foot long. A yard is 3 feet long. I wrapped the yarn (without pulling too tightly) around the ruler 9 times. 9 feet of yarn divided by 3 feet per yard = 3 yards. So I have 3 yards of yarn.

Step 3: Weigh 3 yards of yarn you measured out. You can see that the 3 yards weighs 2 grams.
Step 4: Now the math part. We’ll set up a ratio. Don’t be scared. You did this in 8th grade.

x is the unknown yardage of the cake. We know the cake weighs 113g. So on one side of the equation we write x over 113. We also know that 3 yards of yarn weigh 2g. On the other side of the equation we write 3 over 2. When you do this, be sure that your yardage is on top and your weights are on the bottom on both sides of the equation.
Now cross multiply: x multiplied by 2 on one side of the equation (2x) and 113 multiplied by 3 (339) on the other side of the equation.
Now solve for x. You might remember that what you do to one side of the equation, you must do to the other side of the equation. So divide both sides by 2: 2x divided by 2 equals x; 339 divided by 2 equals 169.5.
And there you have it. You’ve calculated your yardage!!! This means that 113g of this yarn has 169.5 yards in a cake of 113g.

Of course, each skein varies a little in weight. I can use my calculated yardage per skein as an estimate or, if I want a more accurate accounting of how much yarn I have, I can weigh each skein and calculate more precisely by substituting the weight of each skein for 113g in the example above.
Give it a try and let me know how it goes.

Math Monday: Mystery Yarn - The Adventure Begins
Way back in a far away time that seems eons ago (October 2017) my good friend Lee and I went to Rhinebeck, otherwise known as the NYS Sheep and Wool Festival, and not for the first time. Up to that point, we had gone every year for a good many years. For a bunch of reasons, we haven’t been back since, but once this is all over…
As we trolled through the outside buildings on a warm autumn day we came across the Harrisville Designs’ booth. Besides having their own great yarns, Harrisville also does custom spinning for a number of other well-known brands of yarn. We stopped in our tracks when we saw that they were launching n I g h t s h a d e s and spent awhile admiring it. I bought a sweater’s quantity of their lovely WATERshed. Lee kept looking. And then she called me over to the sale bin.
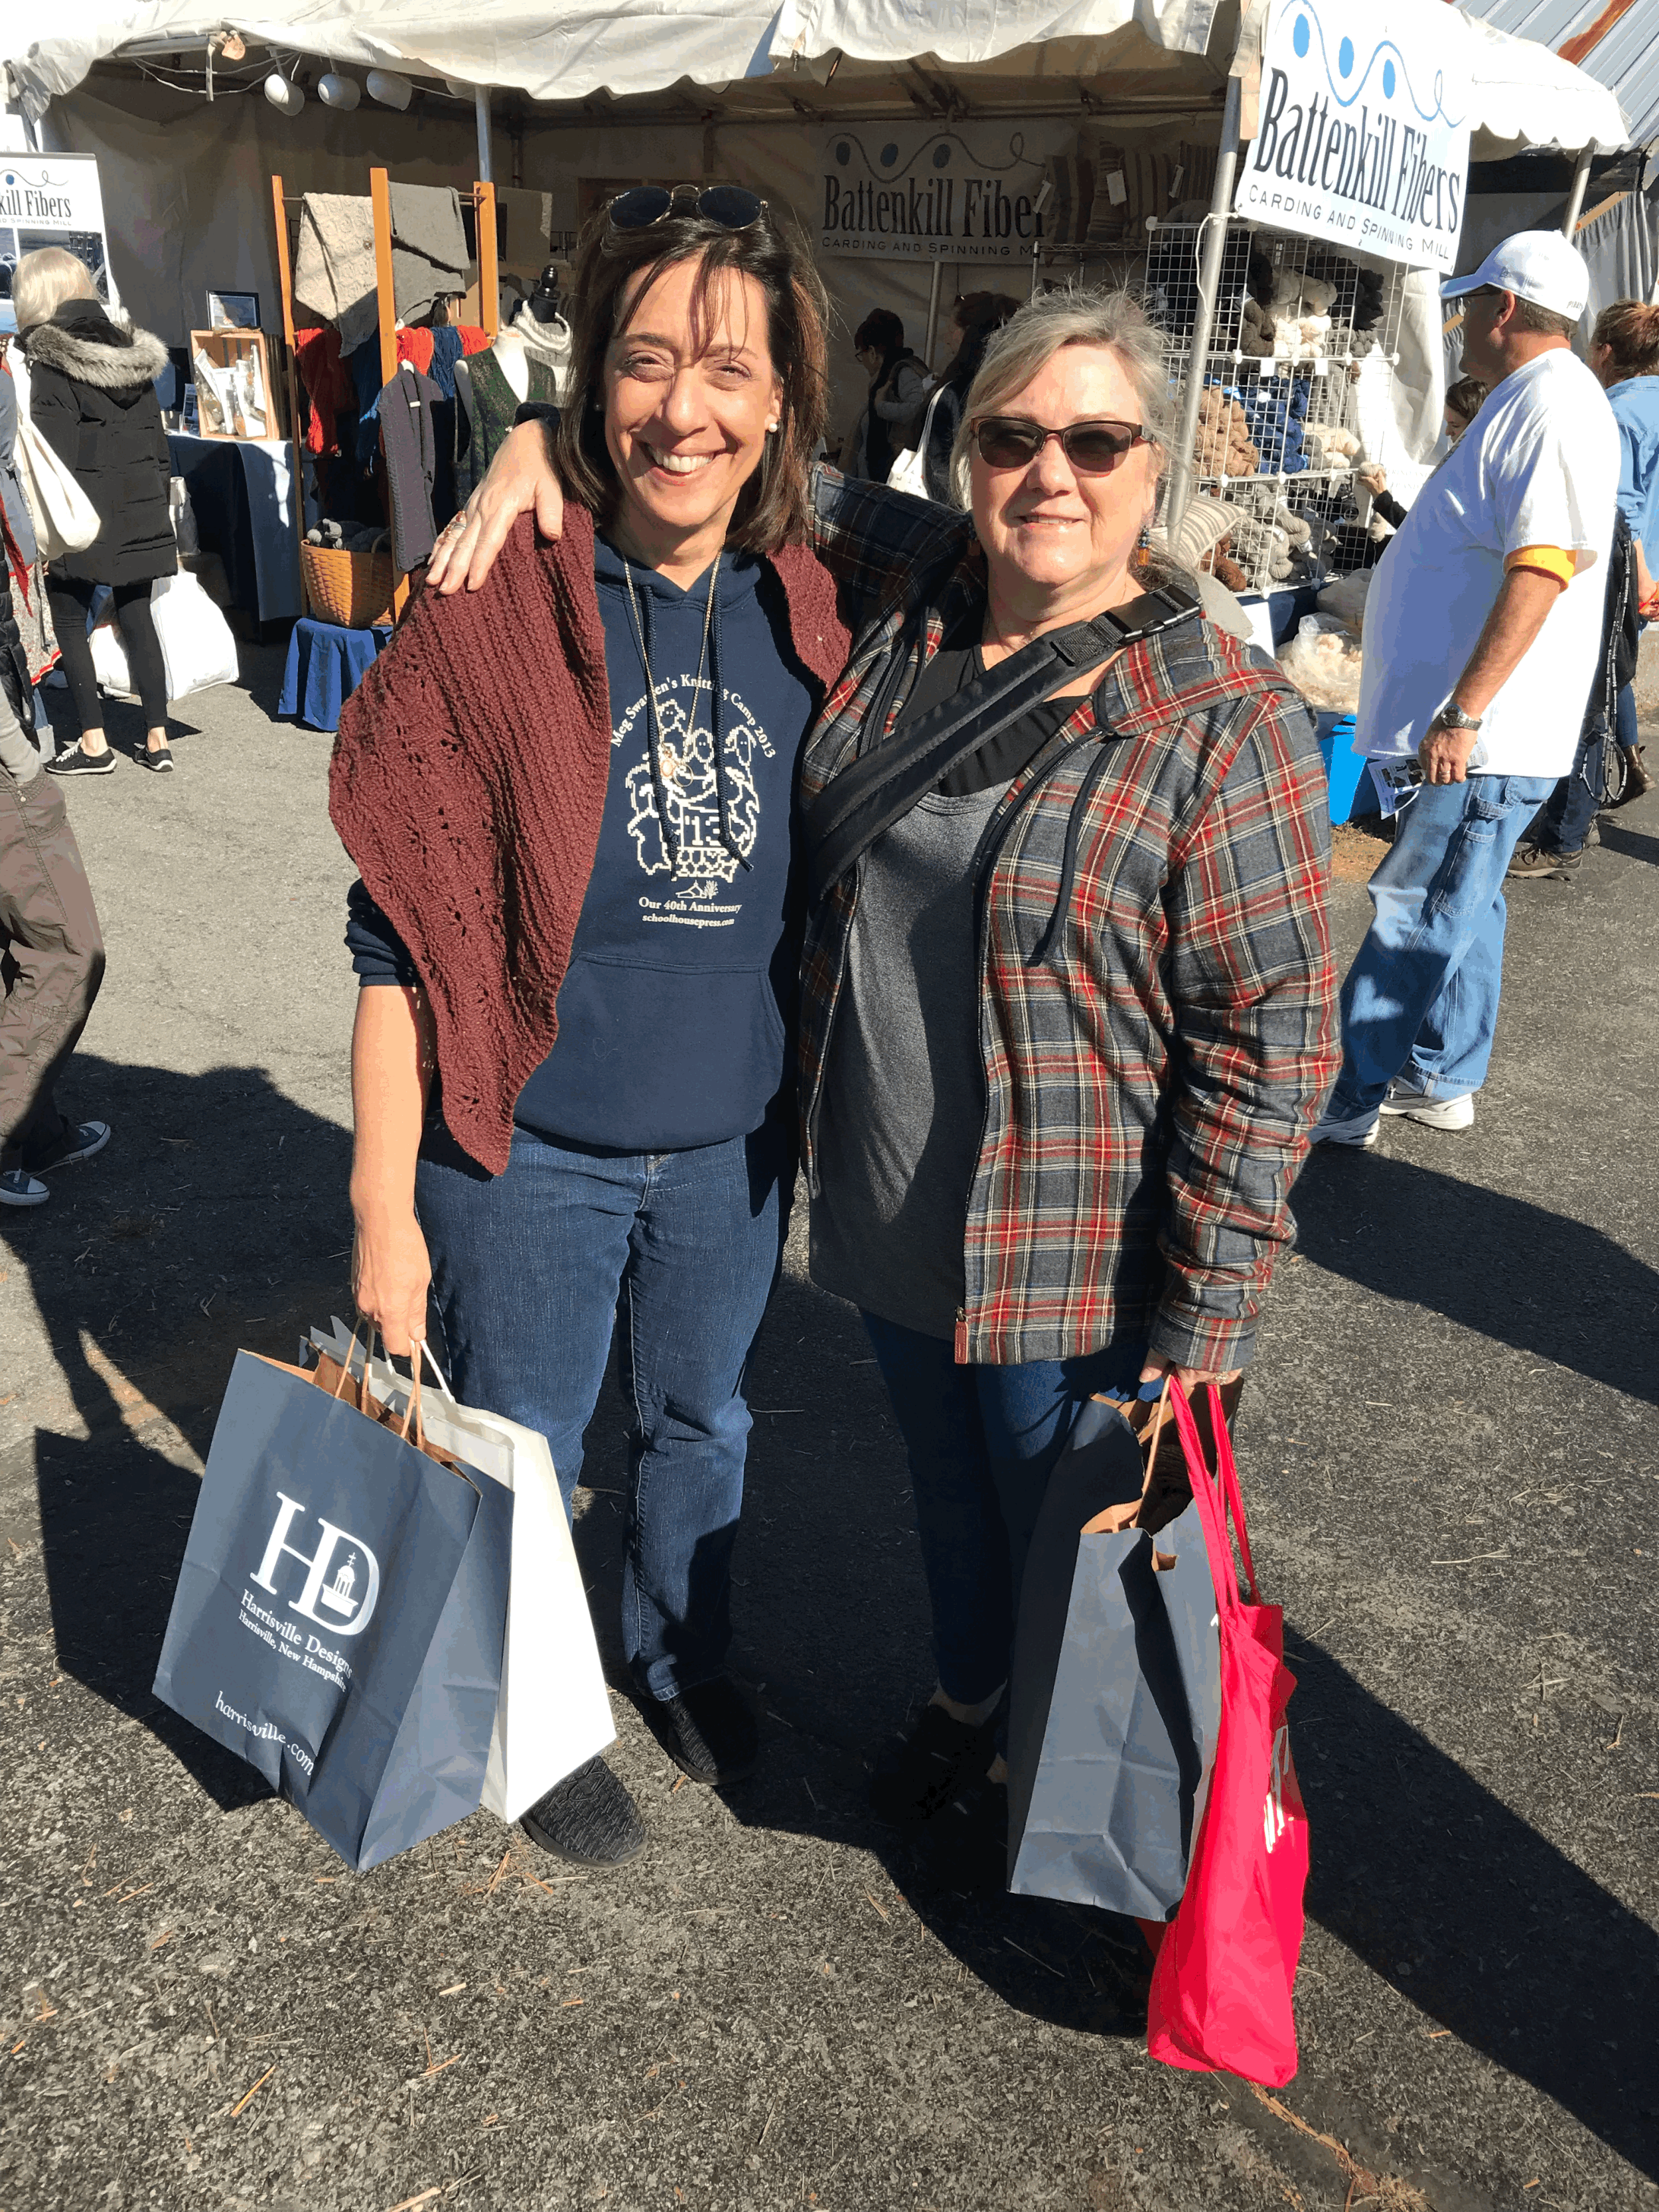
See our Harrisville bags?
Inside was a rustic two-ply wool that was unlabeled. We asked about it, but the only thing the kind Harrisville lady told us was that it was a mill end and that it was 100% wool. Harrisville spins for Brooklyn Tweed, We were both a little smitten. Lee bought 5 skeins. I bought the remaining 3. Occasionally, Lee or I would talk about the yarn, yet neither of us ever did anything with it.

All 8 skeins nestled together!
Fast forward to January 2021. I was doing my semi-annual stash purge and once again came across this yarn. I was still in love. Now you should know that I never to design with any yarn that is discontinued or that I know will be, and certainly never with homespun or an unknown yarn. But this yarn was calling out to be a textured pullover. My 3 skeins wouldn’t do it. So I called Lee, asked her if we could trade - she gave it to me - and it started. The pullover is done, but not yet released.
Over the next few Mondays, I’m going to be writing in this space about yardage. We’ll be estimating and calculating. Yes, it’s math, but don’t be scared! It’s not trigonometry and it’s really rather simple. How will it help you, the knitter? You can calculate yardage you’ve used or how much you need, or how much you’d need if you change an element in your own knitting - like making short sleeves instead of long, or lengthening the body of a sweater. Or perhaps you have your own mystery yarn and want to know if you have enough? Once we’re through, we’ll figure out how we can estimate yarn weight based on yardage.

Analyze this!